Actionscript:
-
var brushNum:int = 10000;
-
var canvas:BitmapData = new BitmapData(800,600,false, 0x000000);
-
addChild(new Bitmap(canvas));
-
-
var shape:Shape = new Shape();
-
with(shape.graphics) beginFill(0xFF0000), drawCircle(10,10,5);
-
shape.filters = [new BlurFilter(6, 6, 4)];
-
-
var brush:BitmapData = new BitmapData(20, 20, false, 0x000000);
-
brush.draw(shape, shape.transform.matrix);
-
-
-
-
// make sure brushVect is fixed length
-
var brushVect:Vector.<uint> = new Vector.<uint>(brush.width * brush.height, true);
-
var tempVect:Vector.<uint> = brush.getVector(brush.rect);
-
var i:int = 0;
-
// quick hack to retain fixed length
-
for (i = 0; i<brushVect.length; i++){
-
brushVect[i] = tempVect[i];
-
}
-
-
canvas.setVector(brush.rect, brushVect);
-
-
var pnt:Point = new Point();
-
var brushRect:Rectangle = brush.rect;
-
var destRect:Rectangle = brushRect.clone();
-
var locX:Vector.<Number> = new Vector.<Number>(brushNum, true);
-
var locY:Vector.<Number> = new Vector.<Number>(brushNum, true);
-
for (i= 0; i<brushNum; i++){
-
locX[i] = Math.random() * stage.stageWidth - 10;
-
locY[i] = Math.random() * stage.stageHeight - 10;
-
}
-
-
var iterations:int = 50;
-
var timer:Number;
-
var avg:Vector.<Number> = new Vector.<Number>();
-
trace("copyPixels");
-
addEventListener(Event.ENTER_FRAME, onLoop);
-
function onLoop(evt:Event):void {
-
canvas.fillRect(canvas.rect, 0x000000);
-
var i:int = brushNum;
-
if (drawMode == "copyPixels"){
-
timer = getTimer();
-
canvas.lock();
-
while(--i> -1){
-
pnt.x = locX[i];
-
pnt.y = locY[i];
-
// copyPixels can easily do alpha manipulation, setVector cannot (see comment below);
-
canvas.copyPixels(brush, brushRect, pnt);//, null, null, true);
-
}
-
canvas.unlock();
-
avg.push(getTimer() - timer);
-
}else{
-
timer = getTimer();
-
canvas.lock();
-
while(--i> -1){
-
destRect.x = locX[i];
-
destRect.y = locY[i];
-
canvas.setVector(destRect, brushVect);
-
}
-
canvas.unlock();
-
avg.push(getTimer() - timer);
-
}
-
// take an average of iterations iterations
-
if (avg.length == iterations){
-
var average:Number = 0;
-
for (i = 0; i<iterations; i++){
-
average += avg[i];
-
}
-
trace(average / iterations);
-
avg = new Vector.<Number>();
-
}
-
}
-
-
var drawMode:String = "copyPixels";
-
stage.addEventListener(KeyboardEvent.KEY_UP, onKeyReleased);
-
function onKeyReleased(evt:Event):void{
-
avg = new Vector.<Number>();
-
drawMode = (drawMode == "copyPixels") ? "setVector" : "copyPixels"
-
trace(drawMode);
-
}
In the comments of a post from a few days back, Piergiorgio Niero mentioned that setVector may be faster than copyPixels. To see if this was true, Piergiorgio and I each tried a few things and while Piergiorgio seemed to reach some conclusions... I wasn't sure we had properly tested to see which one was actually faster.
I created the above snippet to help test to see which is indeed faster. This snippet draws 10,000 small 20x20 pixel graphics to the stage. There is no animation because I wanted to try and isolate the speed of the setVector and copyPixels calls. These are the results on my macbook pro 2.4 ghz duo:
// average speed of 50 iterations of drawing
copyPixels
15.1
15.68
15.44
15.46
15.62
15.74
15.68
setVector
32.6
32.6
31.1
32.1
32.82
32.54
copyPixels
15.48
15.62
15.74
15.46
15.42
15.44
15.64
setVector
32.62
32.8
33.08
32.48
32.74
32.32
If you interested in this, post your results in the comments along with the type of computer you're using. I have a feeling there will be a wide variety of results... just make sure you're not using the flash debug player, as that can act significantly different than the release version of the player.
setVector() and copyPixels() Usage
Something to note here is that setVector and copyPixels aren't normally suitable for the same thing. copyPixels is used to move a rectangle of pixels from one BitmapData to another - you can easily do advanced alpha channel manipulation and scaling with it and you don't have to do pixel by pixel logic. setVector is used to do pixel by pixel manipulation - it is a sort of mature/advanced setPixel function that allows you to do logic on a Vector of uints and then set the pixels of a rectangular region of a BitmapData object equal to the data within that Vector. So if you need to do alpha manipulation or image scaling with setVector you'll find yourself running into some more advanced programming than copyPixels requires... and if you tried to do pixel by pixel manipulation with copyPixels... well, that just isn't what it was meant to be used for...
I'm always wary of these kind of speed tests... if anyone has suggestions about how to improve this test, please feel free to comment.
UPDATE katopz pointed out I should use fixed length Vectors... so I changed the brushVect instantiation code slightly. I didn't do it for the avg vector because it only has 50 values and it doesn't help improve the speed of setVector and copyPixels in any way and complicates the code slightly... it's hard to decide which optimization techniques you should choose to make habbit and which ones you should only whip out when you need speed...
Actionscript:
-
[SWF(width = 750, height = 750)]
-
var canvas:BitmapData = new BitmapData(750,1000,false, 0x000000);
-
addChild(new Bitmap(canvas));
-
-
var loader:Loader = new Loader();
-
loader.load(new URLRequest("http://actionsnippet.com/imgs/paint.jpg"));
-
loader.contentLoaderInfo.addEventListener(Event.COMPLETE, onLoaded);
-
var bit:BitmapData
-
var blurred:BitmapData;
-
function onLoaded(evt:Event):void{
-
bit = Bitmap(evt.target.content).bitmapData;
-
blurred = bit.clone();
-
blurred.applyFilter(blurred, blurred.rect, new Point(0,0), new BlurFilter(4, 4, 6));
-
var blends:Array = [BlendMode.NORMAL,BlendMode.ADD, BlendMode.DARKEN,BlendMode.HARDLIGHT,BlendMode.LIGHTEN, BlendMode.MULTIPLY, BlendMode.OVERLAY,BlendMode.SCREEN, BlendMode.DIFFERENCE];
-
var m:Matrix = new Matrix();
-
for (var i:int = 0; i<blends.length; i++){
-
m.tx = i % 3 * 250;
-
m.ty = int(i / 3) * 250;
-
canvas.draw(bit, m);
-
if (i> 0){
-
canvas.draw(blurred, m, null, blends[i]);
-
}
-
}
-
}
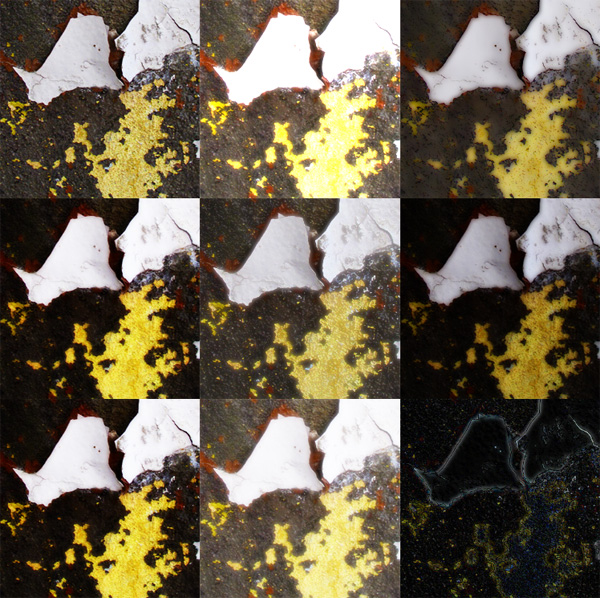
When I used to use photoshop for more than just the most basic of things, I would use a simple technique that employed layer modes (blend modes in flash) and blur. Sometimes, if I had a low quality image that I wanted to make look a little better, or just wanted to give an image a subtle effect, I would duplicate the layer the image was on, blur it and then go through all the layer modes on that duplicate layer until I found something I liked.
This snippet does the same thing with a few select blend modes:

This isn't the greatest image to illustrate the effect, but I didn't feel like digging something better up. Two notable swatches are the upper right (darken) and the lower middle (screen).
Actionscript:
-
[SWF(width=650, height=650)]
-
var loader:Loader = new Loader();
-
loader.load(new URLRequest("http://actionsnippet.com/wp-content/chair.jpg"));
-
loader.contentLoaderInfo.addEventListener(Event.COMPLETE, onLoaded);
-
-
var w:Number;
-
var h:Number;
-
var rows:Number = 20;
-
var cols:Number = 20;
-
var tiles:Vector.<BitmapData> = new Vector.<BitmapData>();
-
var locX:Vector.<Number> = new Vector.<Number>();
-
var locY:Vector.<Number> = new Vector.<Number>();
-
var rX:Vector.<Number> = new Vector.<Number>();
-
var rY:Vector.<Number> = new Vector.<Number>();
-
var sX:Vector.<Number> = new Vector.<Number>();
-
var sY:Vector.<Number> = new Vector.<Number>();
-
function onLoaded(evt:Event):void{
-
w = evt.target.width;
-
h = evt.target.height;
-
var image:BitmapData = Bitmap(evt.target.content).bitmapData;
-
var tileWidth:Number = w / cols;
-
var tileHeight:Number = h / rows;
-
var inc:int = 0;
-
var pnt:Point = new Point();
-
var rect:Rectangle = new Rectangle(0,0,tileWidth,tileHeight);
-
for (var i:int = 0; i<rows; i++){
-
for (var j:int = 0; j<cols; j ++){
-
var currTile:BitmapData= new BitmapData(tileWidth, tileHeight, true, 0x00000000);
-
rect.x = j * tileWidth;
-
rect.y = i * tileHeight;
-
currTile.copyPixels(image, rect, pnt, null, null, true);
-
tiles[inc] = currTile;
-
rect.x += 25;
-
rect.y += 25;
-
sX[inc] = rect.x;
-
sY[inc] = rect.y;
-
locX[inc] = rX[inc] = -rect.width * 2
-
locY[inc] = rY[inc] = Math.random() * stage.stageHeight;
-
setTimeout(startAnimation, inc *4 + 100, inc, rect.x, rect.y);
-
inc++;
-
}
-
}
-
}
-
-
function startAnimation(index:int, dx:Number, dy:Number):void{
-
var interval:Number;
-
var animate:Function = function(index:int):void{
-
locX[index] += (dx - locX[index]) / 4;
-
locY[index] += (dy - locY[index]) / 4;
-
if (Math.abs(locX[index] - dx) <1 && Math.abs(locY[index] - dy)<1){
-
locX[index] = dx;
-
locY[index] = dy;
-
clearInterval(interval);
-
}
-
}
-
interval = setInterval(animate, 32, index);
-
}
-
-
var canvas:BitmapData = new BitmapData(stage.stageWidth,stage.stageHeight,false, 0xFFFFFF);
-
addChild(new Bitmap(canvas));
-
-
var loc:Point = new Point();
-
addEventListener(Event.ENTER_FRAME, onLoop);
-
function onLoop(evt:Event):void {
-
canvas.fillRect(canvas.rect, 0xFFFFFF);
-
for (var i:int = 0; i<tiles.length; i++){
-
var tile:BitmapData= tiles[i];
-
loc.x = locX[i];
-
loc.y = locY[i];
-
canvas.copyPixels(tile, tile.rect, loc, null, null, true);
-
}
-
}
This snippet cuts a dynamically loaded image into a series of smaller BitmapData instances. These BitmapData instances are then drawn to a canvas BitmapData using copyPixels. The BitmapData.copyPixels() method is extremely fast - so this has some advantages over yesterdays post (which did basically the same thing with Sprites). I used setInterval and setTimeout to do a simple demo animation, but I recommend using TweenLite on a real project.
Actionscript:
-
[SWF(width=650, height=650)]
-
var loader:Loader = new Loader();
-
loader.load(new URLRequest("http://actionsnippet.com/wp-content/chair.jpg"));
-
loader.contentLoaderInfo.addEventListener(Event.COMPLETE, onLoaded);
-
x = y = 25;
-
var w:Number;
-
var h:Number;
-
var rows:Number = 20;
-
var cols:Number = 20;
-
var tiles:Vector.<Sprite> = new Vector.<Sprite>();
-
function onLoaded(evt:Event):void{
-
w = evt.target.width;
-
h = evt.target.height;
-
var image:BitmapData = Bitmap(evt.target.content).bitmapData;
-
var tileWidth:Number = w / cols;
-
var tileHeight:Number = h / rows;
-
var inc:int = 0;
-
var pnt:Point = new Point();
-
var rect:Rectangle = new Rectangle(0,0,tileWidth,tileHeight);
-
for (var i:int = 0; i<rows; i++){
-
for (var j:int = 0; j<cols; j ++){
-
var currTile:BitmapData= new BitmapData(tileWidth, tileHeight, true, 0x00000000);
-
rect.x = j * tileWidth;
-
rect.y = i * tileHeight;
-
currTile.copyPixels(image, rect, pnt, null, null, true);
-
var bit:Bitmap = new Bitmap(currTile, "auto", false);
-
var s:Sprite = tiles[inc] = Sprite(addChild(new Sprite()));
-
// offset them a little bit to show that they are in fact tiles.
-
s.x = rect.x + Math.random()*10 - 5;
-
s.y = rect.y + Math.random()*10 - 5;
-
-
/* If you have TweenLite, try something like this:
-
s.x = rect.x;
-
s.y = rect.y;
-
TweenLite.from(s, 0.3, {x:Math.random()*stage.stageWidth, y:Math.random()*stage.stageHeight, alpha:0, delay:inc / 50});
-
*/
-
s.addChild(bit);
-
inc++;
-
}
-
}
-
}
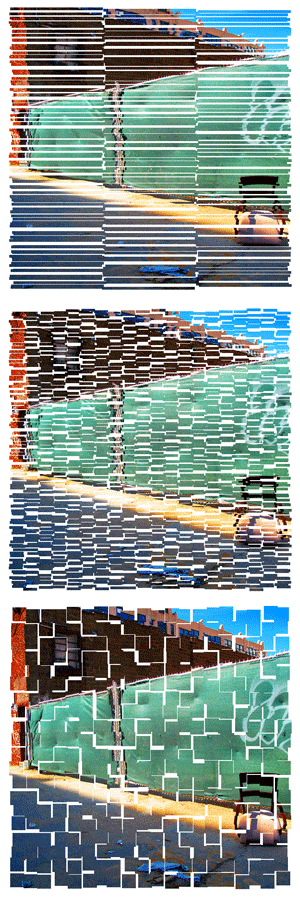
This snippet shows how to cut a dynamically loaded image up into small squares (or rectangles). Each square is placed into a sprite and these sprites are stored in a vector for later use. This kind of thing could be useful in conjunction with tweening engines to create transition effects. If you have TweenLite on your machine you could add the import statement "import gs.TweenLIte" and uncomment lines 33-35.
For the purposes of this demo I just offset each sprite slightly to show that it the loaded image has in face been cut up. Here are a few stills with created by altering the rows and cols variables:

Without any animation, this snippet is a bit boring - again, using TweenLite or some other tweening engine is the way to go.

