Browse the notebook

Category: MovieClip

3D Ring

[SWF(width = 500, height=500)]
var ring:MovieClip = createRing();
ring.x = stage.stageWidth / 2;
ring.y = stage.stageHeight / 2;
addChild(ring);

function createRing(sectionNum:int = 30):MovieClip{
	var container:MovieClip = new MovieClip();
	container.circles = [];
	container.theta = 0;
	container.thetaDest = 0;
	var step:Number = (Math.PI * 2) / sectionNum;
	for (var i:int = 0; i<sectionNum; i++){
		var c:MovieClip = new MovieClip();
		with (c.graphics){
			lineStyle(0,0x000000);
			beginFill(0xCCCCCC);
			drawCircle(0,0,20);
		}
		c.thetaOffset = step * i;
		container.addChild(c);
		container.circles.push(c);
	}
	container.addEventListener(Event.ENTER_FRAME, onRun);
	return container;
}
function onRun(evt:Event):void {
	var container:MovieClip = MovieClip(evt.currentTarget);
	var num:int = container.circles.length;
	for (var i:int = 0; i<num; i++){
		var c:MovieClip = container.circles[i];
		var angle:Number = container.theta + c.thetaOffset;
		c.x = 200 * Math.cos(angle);
		c.y = 100 * Math.sin(angle);
		c.scaleX = (100 + c.y) / 120 + 0.2;
		c.scaleY = c.scaleX;
	}
	container.circles.sortOn("y", Array.NUMERIC);
	for (i = 0; i<num; i++){
		container.addChild(container.circles[i]);
	}
	if (container.mouseX < -100){
		container.thetaDest -= 0.05;
	}
	if (container.mouseX > 100){
		container.thetaDest += 0.05;
	}
	container.theta += (container.thetaDest  - container.theta) / 12;
	
}

This snippet shows how to create a 3D ring navigation using sine and cosine. Have a look:
Ring – wonderfl build flash online
Read snippet: 3D Ring

QuickBox2D Skinning

import com.actionsnippet.qbox.*;

var sim:QuickBox2D = new QuickBox2D(this);

sim.createStageWalls({lineAlpha:0,fillColor:0x000000})
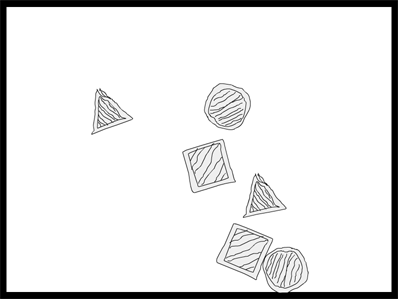
sim.addBox({x:3, y:3, width:3, height:3, skin:BoxSkin});
sim.addCircle({x:3, y:8,radius:1.5,  skin:CircleSkin});
sim.addPoly({x:6, y:3, verts:[[1.5,0,3,3,0,3,1.5,0]], skin:TriangleSkin});

sim.addBox({x:6, y:3, width:3, height:3, skin:BoxSkin});
sim.addCircle({x:6, y:8,radius:1.5,  skin:CircleSkin});
sim.addPoly({x:12, y:3, verts:[[1.5,0,3,3,0,3,1.5,0]], skin:TriangleSkin});

sim.start();
sim.mouseDrag();

You’ll need this fla to run this snippet since the graphics are in the library. This snippet shows how to easily use linkage classes as the graphics for your rigid bodies. This was actually one of the first features I implemented in QuickBox2D.


Take a look at the swf here…

Read snippet: QuickBox2D Skinning

Matrix() 3 Point Skew

[SWF(width=500, height=500, backgroundColor=0xFFFFFF, frameRate=30)]

var box:Sprite = createSprite("Rect", 0, 0, 100, 100, 0xFF0000);

var d0:Sprite = drag(createSprite("Ellipse",  -5, -5, 10, 10));
d0.x = d0.y = 200;

var d1:Sprite = drag(createSprite("Ellipse",  -5, -5, 10, 10));
d1.x = 200
d1.y = 300;

var d2:Sprite = drag(createSprite("Ellipse",  -5, -5, 10, 10));
d2.y = d0.y;
d2.x = 300;

addEventListener(Event.ENTER_FRAME, onLoop);

function onLoop(evt:Event):void {
 
	var m:Matrix = new Matrix();
	m.scale((d2.x - d0.x) / 100,(d1.y - d0.y) / 100);
	m.translate(d0.x, d0.y);
	
	m.c =  (d1.x - d0.x) / 100
	m.b =  (d2.y - d0.y ) / 100
	
	box.transform.matrix = m;
}

function createSprite(shape:String, xp:Number, yp:Number, w:Number, h:Number, col:uint=0x444444):Sprite {
	var s:Sprite = new Sprite();
	s.graphics.beginFill(col);
	s.graphics["draw" + shape](xp, yp, w, h);
	addChild(s);
	return s;
}

function drag(target:*):*{
	target.addEventListener(MouseEvent.MOUSE_DOWN, function(evt:MouseEvent){ evt.currentTarget.startDrag(); });
	return target;
}

stage.addEventListener(MouseEvent.MOUSE_UP, function(){ stopDrag() });

The above creates a red rectangle that can be skewed by dragging 3 points. Why is this so cool you ask?

This is why (move your mouse)

The above was written in flash 7, before the Matrix object existed. So in order to create it I used this technique from Eric Lin.

Read snippet: Matrix() 3 Point Skew

Senocular’s Two Sided 3D Clip

CLICK HERE FOR TODAY’S SNIPPET

In a recent kirupa thread, senocular posted an very useful snippet to aid in the creation of a two sided 3D MovieClip. The thread also contains an in depth description of polygon winding.

Description of Polygon Winding

I created a navigation demo using this technique.

Here is the source for the above demo

UPDATE
Justin Windle of soulwire has written a nice class called PaperSprite that uses this technique. The class is worth checking out – it’s nicely designed… read more about it here.

Read snippet: Senocular’s Two Sided 3D Clip

MovieClip.prototype

MovieClip.prototype.tint = function(col:uint):void {
	var ct:ColorTransform = transform.colorTransform;
	ct.color = col;
	this.transform.colorTransform = ct;
}

var circle:MovieClip = MovieClip(addChild(new MovieClip()));
with (circle.graphics) {
	beginFill(0x123455);
	drawCircle(0,0,50);
	x = 100;
	y = 100;
}

circle.tint(0xFF0000);

When AS3 first came out I didn’t realize that prototype was still around…. This adds a function called tint() to all MovieClips. You should extend MovieClip instead of using this method…. but it’s interesting to see that it’s still around. There’s an explanation of prototype and the AS3 namespace here.

Read snippet: MovieClip.prototype