Actionscript:
-
[SWF(width = 750, height = 750)]
-
var canvas:BitmapData = new BitmapData(750,1000,false, 0x000000);
-
addChild(new Bitmap(canvas));
-
-
var loader:Loader = new Loader();
-
loader.load(new URLRequest("http://actionsnippet.com/imgs/paint.jpg"));
-
loader.contentLoaderInfo.addEventListener(Event.COMPLETE, onLoaded);
-
var bit:BitmapData
-
var blurred:BitmapData;
-
function onLoaded(evt:Event):void{
-
bit = Bitmap(evt.target.content).bitmapData;
-
blurred = bit.clone();
-
blurred.applyFilter(blurred, blurred.rect, new Point(0,0), new BlurFilter(4, 4, 6));
-
var blends:Array = [BlendMode.NORMAL,BlendMode.ADD, BlendMode.DARKEN,BlendMode.HARDLIGHT,BlendMode.LIGHTEN, BlendMode.MULTIPLY, BlendMode.OVERLAY,BlendMode.SCREEN, BlendMode.DIFFERENCE];
-
var m:Matrix = new Matrix();
-
for (var i:int = 0; i<blends.length; i++){
-
m.tx = i % 3 * 250;
-
m.ty = int(i / 3) * 250;
-
canvas.draw(bit, m);
-
if (i> 0){
-
canvas.draw(blurred, m, null, blends[i]);
-
}
-
}
-
}
When I used to use photoshop for more than just the most basic of things, I would use a simple technique that employed layer modes (blend modes in flash) and blur. Sometimes, if I had a low quality image that I wanted to make look a little better, or just wanted to give an image a subtle effect, I would duplicate the layer the image was on, blur it and then go through all the layer modes on that duplicate layer until I found something I liked.
This snippet does the same thing with a few select blend modes:
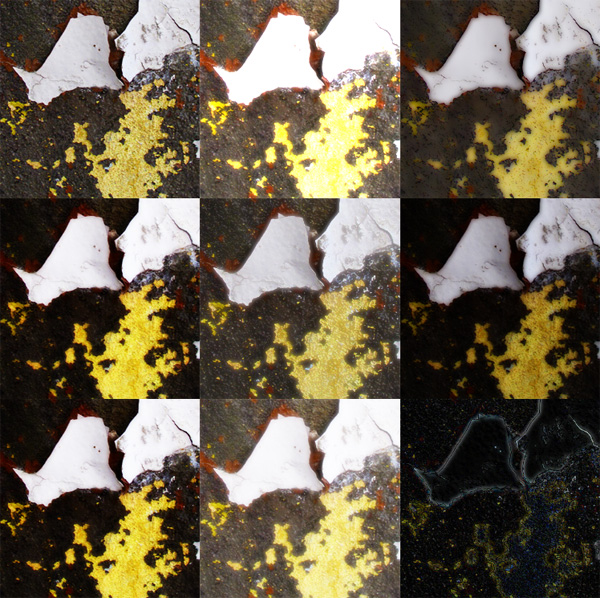
This isn't the greatest image to illustrate the effect, but I didn't feel like digging something better up. Two notable swatches are the upper right (darken) and the lower middle (screen).
Also posted in misc | Tagged actionsnippet, as3, flash |
Actionscript:
-
[SWF(width=650, height=650)]
-
var loader:Loader = new Loader();
-
loader.load(new URLRequest("http://actionsnippet.com/wp-content/chair.jpg"));
-
loader.contentLoaderInfo.addEventListener(Event.COMPLETE, onLoaded);
-
-
var w:Number;
-
var h:Number;
-
var rows:Number = 20;
-
var cols:Number = 20;
-
var tiles:Vector.<BitmapData> = new Vector.<BitmapData>();
-
var locX:Vector.<Number> = new Vector.<Number>();
-
var locY:Vector.<Number> = new Vector.<Number>();
-
var rX:Vector.<Number> = new Vector.<Number>();
-
var rY:Vector.<Number> = new Vector.<Number>();
-
var sX:Vector.<Number> = new Vector.<Number>();
-
var sY:Vector.<Number> = new Vector.<Number>();
-
function onLoaded(evt:Event):void{
-
w = evt.target.width;
-
h = evt.target.height;
-
var image:BitmapData = Bitmap(evt.target.content).bitmapData;
-
var tileWidth:Number = w / cols;
-
var tileHeight:Number = h / rows;
-
var inc:int = 0;
-
var pnt:Point = new Point();
-
var rect:Rectangle = new Rectangle(0,0,tileWidth,tileHeight);
-
for (var i:int = 0; i<rows; i++){
-
for (var j:int = 0; j<cols; j ++){
-
var currTile:BitmapData= new BitmapData(tileWidth, tileHeight, true, 0x00000000);
-
rect.x = j * tileWidth;
-
rect.y = i * tileHeight;
-
currTile.copyPixels(image, rect, pnt, null, null, true);
-
tiles[inc] = currTile;
-
rect.x += 25;
-
rect.y += 25;
-
sX[inc] = rect.x;
-
sY[inc] = rect.y;
-
locX[inc] = rX[inc] = -rect.width * 2
-
locY[inc] = rY[inc] = Math.random() * stage.stageHeight;
-
setTimeout(startAnimation, inc *4 + 100, inc, rect.x, rect.y);
-
inc++;
-
}
-
}
-
}
-
-
function startAnimation(index:int, dx:Number, dy:Number):void{
-
var interval:Number;
-
var animate:Function = function(index:int):void{
-
locX[index] += (dx - locX[index]) / 4;
-
locY[index] += (dy - locY[index]) / 4;
-
if (Math.abs(locX[index] - dx) <1 && Math.abs(locY[index] - dy)<1){
-
locX[index] = dx;
-
locY[index] = dy;
-
clearInterval(interval);
-
}
-
}
-
interval = setInterval(animate, 32, index);
-
}
-
-
var canvas:BitmapData = new BitmapData(stage.stageWidth,stage.stageHeight,false, 0xFFFFFF);
-
addChild(new Bitmap(canvas));
-
-
var loc:Point = new Point();
-
addEventListener(Event.ENTER_FRAME, onLoop);
-
function onLoop(evt:Event):void {
-
canvas.fillRect(canvas.rect, 0xFFFFFF);
-
for (var i:int = 0; i<tiles.length; i++){
-
var tile:BitmapData= tiles[i];
-
loc.x = locX[i];
-
loc.y = locY[i];
-
canvas.copyPixels(tile, tile.rect, loc, null, null, true);
-
}
-
}
This snippet cuts a dynamically loaded image into a series of smaller BitmapData instances. These BitmapData instances are then drawn to a canvas BitmapData using copyPixels. The BitmapData.copyPixels() method is extremely fast - so this has some advantages over yesterdays post (which did basically the same thing with Sprites). I used setInterval and setTimeout to do a simple demo animation, but I recommend using TweenLite on a real project.
Also posted in Vector | Tagged actionscript, as3, flash |
Actionscript:
-
[SWF(width=650, height=650)]
-
var loader:Loader = new Loader();
-
loader.load(new URLRequest("http://actionsnippet.com/wp-content/chair.jpg"));
-
loader.contentLoaderInfo.addEventListener(Event.COMPLETE, onLoaded);
-
x = y = 25;
-
var w:Number;
-
var h:Number;
-
var rows:Number = 20;
-
var cols:Number = 20;
-
var tiles:Vector.<Sprite> = new Vector.<Sprite>();
-
function onLoaded(evt:Event):void{
-
w = evt.target.width;
-
h = evt.target.height;
-
var image:BitmapData = Bitmap(evt.target.content).bitmapData;
-
var tileWidth:Number = w / cols;
-
var tileHeight:Number = h / rows;
-
var inc:int = 0;
-
var pnt:Point = new Point();
-
var rect:Rectangle = new Rectangle(0,0,tileWidth,tileHeight);
-
for (var i:int = 0; i<rows; i++){
-
for (var j:int = 0; j<cols; j ++){
-
var currTile:BitmapData= new BitmapData(tileWidth, tileHeight, true, 0x00000000);
-
rect.x = j * tileWidth;
-
rect.y = i * tileHeight;
-
currTile.copyPixels(image, rect, pnt, null, null, true);
-
var bit:Bitmap = new Bitmap(currTile, "auto", false);
-
var s:Sprite = tiles[inc] = Sprite(addChild(new Sprite()));
-
// offset them a little bit to show that they are in fact tiles.
-
s.x = rect.x + Math.random()*10 - 5;
-
s.y = rect.y + Math.random()*10 - 5;
-
-
/* If you have TweenLite, try something like this:
-
s.x = rect.x;
-
s.y = rect.y;
-
TweenLite.from(s, 0.3, {x:Math.random()*stage.stageWidth, y:Math.random()*stage.stageHeight, alpha:0, delay:inc / 50});
-
*/
-
s.addChild(bit);
-
inc++;
-
}
-
}
-
}
This snippet shows how to cut a dynamically loaded image up into small squares (or rectangles). Each square is placed into a sprite and these sprites are stored in a vector for later use. This kind of thing could be useful in conjunction with tweening engines to create transition effects. If you have TweenLite on your machine you could add the import statement "import gs.TweenLIte" and uncomment lines 33-35.
For the purposes of this demo I just offset each sprite slightly to show that it the loaded image has in face been cut up. Here are a few stills with created by altering the rows and cols variables:
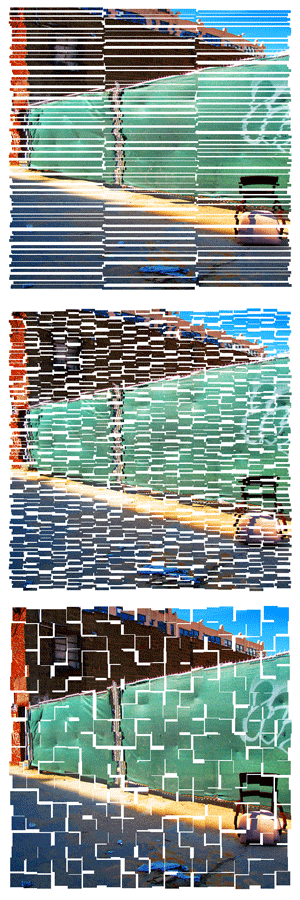
Without any animation, this snippet is a bit boring - again, using TweenLite or some other tweening engine is the way to go.
Actionscript:
-
stage.frameRate = 30;
-
stage.quality = StageQuality.LOW;
-
-
var canvas:BitmapData = new BitmapData(400,400,false, 0x000000);
-
addChild(new Bitmap(canvas));
-
var overlay:BitmapData = new BitmapData(400,400,true, 0x12000000);
-
var particles:Dictionary = new Dictionary(true);
-
-
var blur:Array = [new BlurFilter(8,8,1)];
-
-
addEventListener(Event.ENTER_FRAME, onLoop);
-
function onLoop(evt:Event):void {
-
for (var i:int= 0; i<3; i++) createParticle();
-
canvas.copyPixels(overlay, canvas.rect, new Point(0,0), null, null, true);
-
}
-
-
function createParticle():void{
-
var s:MovieClip = new MovieClip();
-
var diameter:Number = Math.random()*50 + 2;
-
var radius:Number = diameter / 2;
-
var mat:Matrix = new Matrix();
-
mat.createGradientBox(diameter, diameter, 0, -radius, -radius);
-
mat.createGradientBox(diameter, diameter, 0, -radius, -radius);
-
s.graphics.beginGradientFill(GradientType.RADIAL, [ 0xFFCC32, 0xFF0000], [0.5,0.8], [0, 255], mat, SpreadMethod.PAD);
-
s.graphics.drawCircle(0,0,radius);
-
s.velX = 0;
-
s.velY = -Math.random()*6 + 3;
-
s.posX = s.x = 150+ Math.random() * 100;
-
s.posY = s.y = 200;
-
s.theta= Math.random() * Math.PI * 2;
-
s.inc = Math.random() * 0.4 + 0.01;
-
s.rad = Math.random() * 4 + 1;
-
s.filters = blur;
-
// since the particles aren't on the display list, we need to keep a reference to them
-
particles[s] = s;
-
s.addEventListener(Event.ENTER_FRAME, onRunParticle);
-
}
-
function onRunParticle(evt:Event):void {
-
var s:MovieClip = MovieClip(evt.currentTarget);
-
s.posX += s.velX;
-
s.posY += s.velY;
-
s.velX = s.rad * Math.cos(s.theta);
-
s.theta += s.inc;
-
s.scaleX = s.scaleY -= .03;
-
if (s.scaleX <0){
-
particles[s] = null;
-
s.removeEventListener(Event.ENTER_FRAME, onRunParticle);
-
}
-
s.x = s.posX;
-
s.y = s.posY;
-
canvas.draw(s, s.transform.matrix, null, BlendMode.ADD);
-
}
This is a slight variation on a simple particle system that I show in my intermediate class. It is almost the same as this example. But it makes use of filters and BitmapData.
Here is a still generated with this snippet. You'll notice it vaguely resembles fire.

If you need more particles, there are other approaches that are more appropriate.