Actionscript:
-
[SWF(width=650, height=650)]
-
var loader:Loader = new Loader();
-
loader.load(new URLRequest("http://actionsnippet.com/wp-content/chair.jpg"));
-
loader.contentLoaderInfo.addEventListener(Event.COMPLETE, onLoaded);
-
x = y = 25;
-
var w:Number;
-
var h:Number;
-
var rows:Number = 20;
-
var cols:Number = 20;
-
var tiles:Vector.<Sprite> = new Vector.<Sprite>();
-
function onLoaded(evt:Event):void{
-
w = evt.target.width;
-
h = evt.target.height;
-
var image:BitmapData = Bitmap(evt.target.content).bitmapData;
-
var tileWidth:Number = w / cols;
-
var tileHeight:Number = h / rows;
-
var inc:int = 0;
-
var pnt:Point = new Point();
-
var rect:Rectangle = new Rectangle(0,0,tileWidth,tileHeight);
-
for (var i:int = 0; i<rows; i++){
-
for (var j:int = 0; j<cols; j ++){
-
var currTile:BitmapData= new BitmapData(tileWidth, tileHeight, true, 0x00000000);
-
rect.x = j * tileWidth;
-
rect.y = i * tileHeight;
-
currTile.copyPixels(image, rect, pnt, null, null, true);
-
var bit:Bitmap = new Bitmap(currTile, "auto", false);
-
var s:Sprite = tiles[inc] = Sprite(addChild(new Sprite()));
-
// offset them a little bit to show that they are in fact tiles.
-
s.x = rect.x + Math.random()*10 - 5;
-
s.y = rect.y + Math.random()*10 - 5;
-
-
/* If you have TweenLite, try something like this:
-
s.x = rect.x;
-
s.y = rect.y;
-
TweenLite.from(s, 0.3, {x:Math.random()*stage.stageWidth, y:Math.random()*stage.stageHeight, alpha:0, delay:inc / 50});
-
*/
-
s.addChild(bit);
-
inc++;
-
}
-
}
-
}
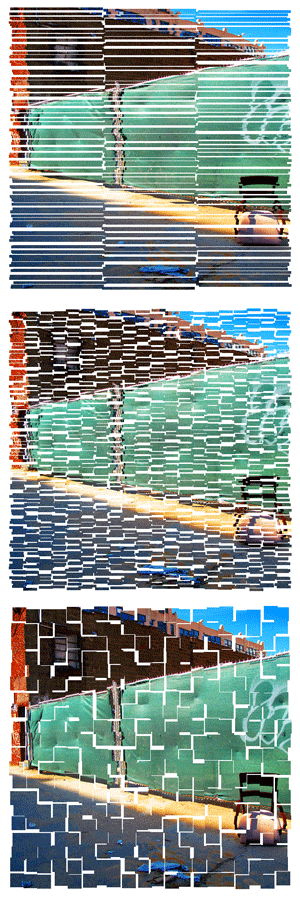
This snippet shows how to cut a dynamically loaded image up into small squares (or rectangles). Each square is placed into a sprite and these sprites are stored in a vector for later use. This kind of thing could be useful in conjunction with tweening engines to create transition effects. If you have TweenLite on your machine you could add the import statement "import gs.TweenLIte" and uncomment lines 33-35.
For the purposes of this demo I just offset each sprite slightly to show that it the loaded image has in face been cut up. Here are a few stills with created by altering the rows and cols variables:

Without any animation, this snippet is a bit boring - again, using TweenLite or some other tweening engine is the way to go.
Actionscript:
-
stage.frameRate = 30;
-
stage.quality = StageQuality.LOW;
-
-
var canvas:BitmapData = new BitmapData(400,400,false, 0x000000);
-
addChild(new Bitmap(canvas));
-
var overlay:BitmapData = new BitmapData(400,400,true, 0x12000000);
-
var particles:Dictionary = new Dictionary(true);
-
-
var blur:Array = [new BlurFilter(8,8,1)];
-
-
addEventListener(Event.ENTER_FRAME, onLoop);
-
function onLoop(evt:Event):void {
-
for (var i:int= 0; i<3; i++) createParticle();
-
canvas.copyPixels(overlay, canvas.rect, new Point(0,0), null, null, true);
-
}
-
-
function createParticle():void{
-
var s:MovieClip = new MovieClip();
-
var diameter:Number = Math.random()*50 + 2;
-
var radius:Number = diameter / 2;
-
var mat:Matrix = new Matrix();
-
mat.createGradientBox(diameter, diameter, 0, -radius, -radius);
-
mat.createGradientBox(diameter, diameter, 0, -radius, -radius);
-
s.graphics.beginGradientFill(GradientType.RADIAL, [ 0xFFCC32, 0xFF0000], [0.5,0.8], [0, 255], mat, SpreadMethod.PAD);
-
s.graphics.drawCircle(0,0,radius);
-
s.velX = 0;
-
s.velY = -Math.random()*6 + 3;
-
s.posX = s.x = 150+ Math.random() * 100;
-
s.posY = s.y = 200;
-
s.theta= Math.random() * Math.PI * 2;
-
s.inc = Math.random() * 0.4 + 0.01;
-
s.rad = Math.random() * 4 + 1;
-
s.filters = blur;
-
// since the particles aren't on the display list, we need to keep a reference to them
-
particles[s] = s;
-
s.addEventListener(Event.ENTER_FRAME, onRunParticle);
-
}
-
function onRunParticle(evt:Event):void {
-
var s:MovieClip = MovieClip(evt.currentTarget);
-
s.posX += s.velX;
-
s.posY += s.velY;
-
s.velX = s.rad * Math.cos(s.theta);
-
s.theta += s.inc;
-
s.scaleX = s.scaleY -= .03;
-
if (s.scaleX <0){
-
particles[s] = null;
-
s.removeEventListener(Event.ENTER_FRAME, onRunParticle);
-
}
-
s.x = s.posX;
-
s.y = s.posY;
-
canvas.draw(s, s.transform.matrix, null, BlendMode.ADD);
-
}
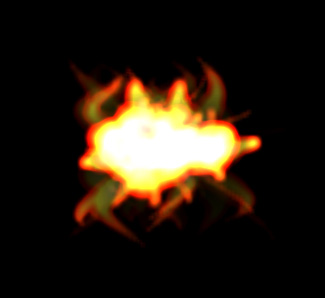
This is a slight variation on a simple particle system that I show in my intermediate class. It is almost the same as this example. But it makes use of filters and BitmapData.
Here is a still generated with this snippet. You'll notice it vaguely resembles fire.

If you need more particles, there are other approaches that are more appropriate.
Actionscript:
-
[SWF(width = 700, height = 700)]
-
-
var loader:Loader = new Loader();
-
loader.load(new URLRequest("http://actionsnippet.com/wp-content/chair.jpg"));
-
loader.contentLoaderInfo.addEventListener(Event.COMPLETE, onLoaded);
-
var tex:BitmapData;
-
function onLoaded(evt:Event):void{
-
tex = Bitmap(loader.content).bitmapData;
-
addEventListener(Event.ENTER_FRAME, onLoop);
-
}
-
-
var plane:Shape = Shape(addChild(new Shape()));
-
plane.x = plane.y = 50;
-
-
var verts:Vector.<Number> = new Vector.<Number>();
-
var uvs:Vector.<Number> = new Vector.<Number>();
-
var indices:Vector.<int> = new Vector.<int>();
-
var rows:int = 30;
-
var size:Number = rows + 1;
-
var vertNum:Number = size * size;
-
var polySize:Number = 20;
-
var vIndex:int = 0;
-
var uvIndex:int = 0;
-
var gridSize:Number = rows * polySize;
-
for (var i:Number = 0; i<vertNum; i++){
-
var xp:Number = i % size * polySize;
-
var yp:Number = int(i / size) * polySize;
-
verts[vIndex++] = xp
-
verts[vIndex++] = yp;
-
uvs[uvIndex++] = xp / gridSize;
-
uvs[uvIndex++] = yp / gridSize;
-
if (i % size != rows){
-
indices.push(i, i+1, i+size, i+size, i+size+1, i+1);
-
}
-
}
-
-
// render and show that the verts can be changed around
-
function onLoop(evt:Event):void {
-
// shake the verts
-
for (var i:int = 0; i<verts.length; i++){
-
verts[i] += Math.random() - 0.5;
-
}
-
with(plane.graphics){
-
clear();
-
beginBitmapFill(tex,null, false, true);
-
drawTriangles(verts, indices,uvs);
-
}
-
}
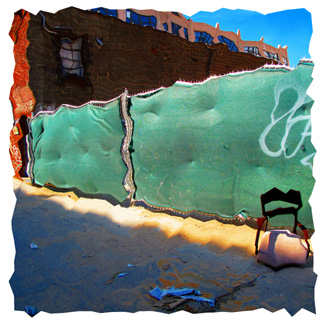
This snippet is shows how to draw a textured 2D plane using drawTriangles(). This is similar to the wireframe 2D plane post from yesterday... the main difference is that you need to calculate UV coordinates if you want to use a bitmap fill with drawTriangles().
Here is a still of this snippet:

Actionscript:
-
var plane:Shape = Shape(addChild(new Shape()));
-
plane.x = plane.y = 50;
-
-
var verts:Vector.<Number> = new Vector.<Number>();
-
var indices:Vector.<int> = new Vector.<int>();
-
var rows:int = 20;
-
var size:Number = rows + 1;
-
var vertNum:Number = size * size;
-
var polySize:Number = 20;
-
var vIndex:int = 0;
-
for (var i:Number = 0; i<vertNum; i++){
-
verts[vIndex++] = i % size * polySize;
-
verts[vIndex++] = int(i / size) * polySize;
-
if (i % size != rows){
-
indices.push(i, i+1, i+size, i+size, i+size+1, i+1);
-
}
-
}
-
-
// render and show that the verts can be changed around
-
addEventListener(Event.ENTER_FRAME, onLoop);
-
function onLoop(evt:Event):void {
-
// shake the verts
-
for (var i:int = 0; i<verts.length; i++){
-
verts[i] += Math.random() - 0.5;
-
}
-
with(plane.graphics){
-
clear();
-
lineStyle(0,0);
-
drawTriangles(verts, indices);
-
}
-
}
This snippet shows a simple way to draw a 2D wireframe plane using drawTriangles(). To demonstrate the flexibility of the plane... the vertices are randomly shaken on enterframe.
Posted in Graphics, Vector | Also tagged actionscript, flash |


