Actionscript:
-
var grid:Sprite = Sprite(addChild(new Sprite()));
-
var matrix:Matrix = new Matrix();
-
// make the grid sprite look isometric using the transform.matrix property
-
matrix.rotate(Math.PI / 4);
-
matrix.scale(1, 0.5);
-
matrix.translate(stage.stageWidth / 2, stage.stageHeight / 2);
-
grid.transform.matrix = matrix;
-
-
// draw a grid of circles to show that it does in fact look isometric
-
var rowCol:Number = 8;
-
var num:Number = rowCol * rowCol;
-
-
var diameter:Number = 40;
-
var radius:Number = diameter / 2;
-
var space:Number = diameter + 10;
-
var halfGridSize:Number = rowCol * space / 2;
-
-
grid.graphics.beginFill(0xFF0000);
-
for (var i:int = 0; i<num; i++){
-
grid.graphics.drawCircle(i % 8 * space - halfGridSize, int(i / 8) * space - halfGridSize, radius);
-
}
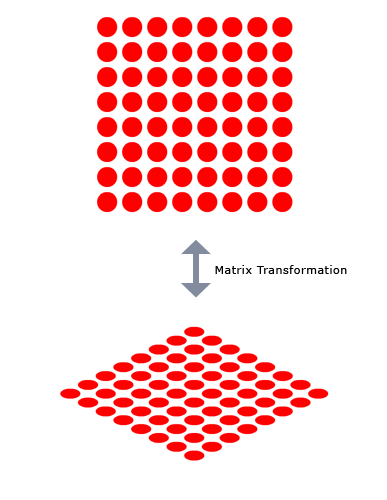
This snippet shows how to use transform.matrix to make a DisplayObject look isometric. This can also be achieved with nesting.
In the case of this grid of red circles, we rotate it 45 degrees, scale it 50% on the y and move it to the center of the stage (lines 4-6).

Also posted in DisplayObject |
Didn't get a chance to post today but will do two posts tomorrow... been looking into things related to convex and concave functions... here are some links related to that topic:
http://en.wikipedia.org/wiki/Convex_function
http://www.economics.utoronto.ca/osborne/MathTutorial/CVNF.HTM
Will probably have at least two snippets related to this in the near future...
Actionscript:
-
[SWF(width = 750, height = 750)]
-
var canvas:BitmapData = new BitmapData(750,1000,false, 0x000000);
-
addChild(new Bitmap(canvas));
-
-
var loader:Loader = new Loader();
-
loader.load(new URLRequest("http://actionsnippet.com/imgs/paint.jpg"));
-
loader.contentLoaderInfo.addEventListener(Event.COMPLETE, onLoaded);
-
var bit:BitmapData
-
var blurred:BitmapData;
-
function onLoaded(evt:Event):void{
-
bit = Bitmap(evt.target.content).bitmapData;
-
blurred = bit.clone();
-
blurred.applyFilter(blurred, blurred.rect, new Point(0,0), new BlurFilter(4, 4, 6));
-
var blends:Array = [BlendMode.NORMAL,BlendMode.ADD, BlendMode.DARKEN,BlendMode.HARDLIGHT,BlendMode.LIGHTEN, BlendMode.MULTIPLY, BlendMode.OVERLAY,BlendMode.SCREEN, BlendMode.DIFFERENCE];
-
var m:Matrix = new Matrix();
-
for (var i:int = 0; i<blends.length; i++){
-
m.tx = i % 3 * 250;
-
m.ty = int(i / 3) * 250;
-
canvas.draw(bit, m);
-
if (i> 0){
-
canvas.draw(blurred, m, null, blends[i]);
-
}
-
}
-
}
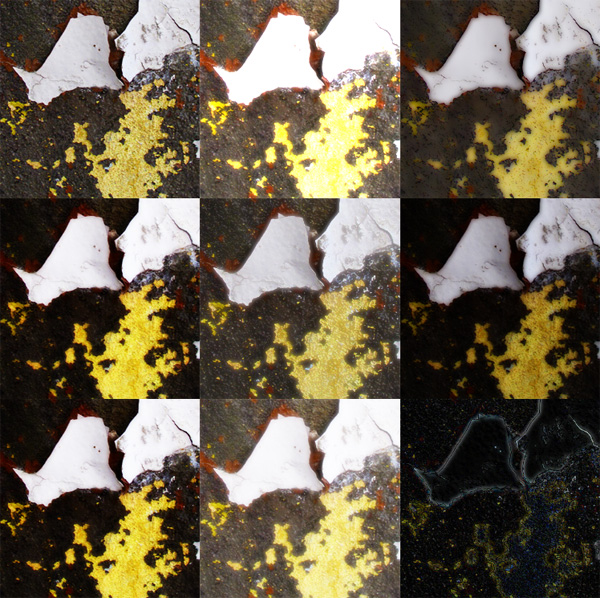
When I used to use photoshop for more than just the most basic of things, I would use a simple technique that employed layer modes (blend modes in flash) and blur. Sometimes, if I had a low quality image that I wanted to make look a little better, or just wanted to give an image a subtle effect, I would duplicate the layer the image was on, blur it and then go through all the layer modes on that duplicate layer until I found something I liked.
This snippet does the same thing with a few select blend modes:

This isn't the greatest image to illustrate the effect, but I didn't feel like digging something better up. Two notable swatches are the upper right (darken) and the lower middle (screen).
Also posted in BitmapData | Tagged actionsnippet, as3, flash |
Actionscript:
-
var loc:Vector.<Point> = new Vector.<Point>();
-
var lifts:Vector.<int> = new Vector.<int>();
-
var index:int = 0;
-
var resolution:int = 1;
-
var down:Boolean;
-
stage.addEventListener(MouseEvent.MOUSE_DOWN, onDown);
-
stage.addEventListener(MouseEvent.MOUSE_UP, onUp);
-
stage.addEventListener(KeyboardEvent.KEY_DOWN, onKeyReleased);
-
addEventListener(Event.ENTER_FRAME, onLoop);
-
function onKeyReleased(evt:KeyboardEvent):void{
-
if (evt.keyCode == Keyboard.RIGHT){
-
resolution -= 1;
-
if (resolution <1) resolution = 1;
-
}else
-
if (evt.keyCode == Keyboard.LEFT){
-
resolution += 1;
-
}
-
}
-
function onDown(evt:MouseEvent):void{
-
down = true;
-
lifts.push(index);
-
}
-
function onUp(evt:MouseEvent):void{
-
down = false;
-
}
-
function onLoop(evt:Event):void {
-
if (down){
-
loc[index] = new Point(mouseX, mouseY);
-
index++;
-
}
-
graphics.clear();
-
graphics.lineStyle(0,0x000000);
-
var j:int = 0;
-
var lift:int;
-
var liftLength:int = lifts.length;
-
var lastLoc:int = loc.length - 1;
-
for (var i:int = 0; i<liftLength; i++){
-
j = lifts[i];
-
graphics.moveTo(loc[j].x, loc[j].y);
-
if (i <liftLength - 1){
-
lift = lifts[i + 1] - 1;
-
}else{
-
lift = lastLoc;
-
}
-
while (j <lift){
-
j++;
-
if (j % resolution == 1 || resolution == 1){
-
graphics.lineTo(loc[j].x, loc[j].y);
-
}
-
}
-
graphics.lineTo(loc[j].x, loc[j].y);
-
}
-
}
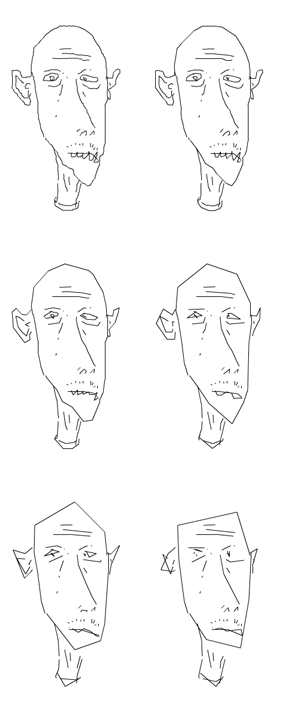
This snippet shows a simple approach to creating variable resolution graphics.
This is an improved version of yesterdays post. In yesterdays example the end points of the lines would sometimes be removed... this version doesn't have that problem...
Below is a drawing created using this snippet. The left arrow key is used to decrease resolution and the right arrow key is used to increase resolution:
Have a look at the swf...

Also posted in Graphics | Tagged actionscript, as3, flash |


