Actionscript:
-
var rand:Number = Math.random() * Math.random() * Math.random();
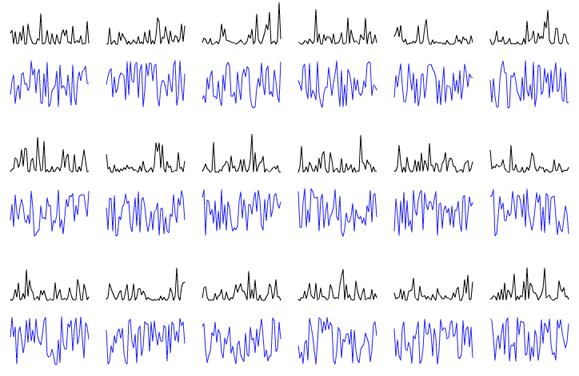
This is a trick I use when I need more contrast in my random numbers. In this case, the variable rand will get closer to the number 1 significantly less frequently than if you just used Math.random() once.
To illustrate this I created this snippet:
Actionscript:
-
[SWF(width=800, height=600)]
-
-
var r:Number = Math.random() * Math.random() * Math.random();
-
var inc:int = 0;
-
var xp:Number = 10;
-
var yp:Number = 10;
-
var count:int = 1;
-
-
var compare:Shape = Shape(addChild(new Shape()));
-
compare.graphics.lineStyle(0,0x2222FF);
-
-
graphics.lineStyle(0,0x00000);
-
scaleX = scaleY = 2;
-
-
addEventListener(Event.ENTER_FRAME, onLoop);
-
function onLoop(evt:Event):void {
-
-
r = Math.random() * Math.random() * Math.random();
-
-
if (inc == 0){
-
graphics.moveTo(xp + inc, yp + 30 - r * 30);
-
}else{
-
graphics.lineTo(xp + inc, yp + 30 - r * 30);
-
}
-
-
r = Math.random();
-
if (inc == 0){
-
compare.graphics.moveTo(xp + inc, yp + 70 - r * 30);
-
}else{
-
compare.graphics.lineTo(xp + inc, yp + 70 - r * 30);
-
}
-
inc++;
-
if (inc == 50){
-
inc = 0;
-
xp = 10 + count % 6 * 60;
-
yp = 10 + int(count / 6) * 80;
-
r = Math.random()*Math.random();
-
count++;
-
}
-
}
The blue lines plots normal Math.random() and the black lines plots Math.random()*Math.random()*Math.random()

Actionscript:
-
import com.actionsnippet.qbox.*;
-
-
var sim:QuickBox2D = new QuickBox2D(this);
-
-
sim.createStageWalls({lineAlpha:0,fillColor:0x000000})
-
sim.addBox({x:3, y:3, width:3, height:3, skin:BoxSkin});
-
sim.addCircle({x:3, y:8,radius:1.5, skin:CircleSkin});
-
sim.addPoly({x:6, y:3, verts:[[1.5,0,3,3,0,3,1.5,0]], skin:TriangleSkin});
-
-
sim.addBox({x:6, y:3, width:3, height:3, skin:BoxSkin});
-
sim.addCircle({x:6, y:8,radius:1.5, skin:CircleSkin});
-
sim.addPoly({x:12, y:3, verts:[[1.5,0,3,3,0,3,1.5,0]], skin:TriangleSkin});
-
-
sim.start();
-
sim.mouseDrag();
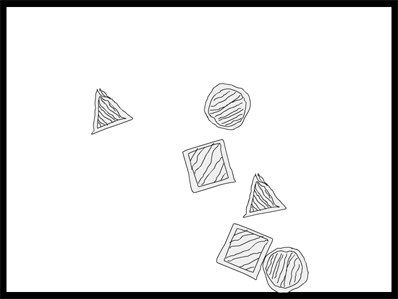
You'll need this fla to run this snippet since the graphics are in the library. This snippet shows how to easily use linkage classes as the graphics for your rigid bodies. This was actually one of the first features I implemented in QuickBox2D.
Take a look at the swf here...

Actionscript:
-
import com.actionsnippet.qbox.*;
-
import Box2D.Common.Math.*;
-
-
stage.frameRate = 60;
-
-
var sim:QuickBox2D = new QuickBox2D(this);
-
-
sim.createStageWalls();
-
-
createTraveler(3, 3);
-
-
addObstacles();
-
-
function addObstacles():void{
-
sim.setDefault({groupIndex:-1, density:0, height:0.4});
-
sim.addBox({x:6, y:5, width:8, angle:0.17})
-
sim.addBox({x:7, y:7.1, width:8, angle:-0.17})
-
sim.addBox({x:5, y:9.1, width:8, angle:0.10})
-
sim.addBox({x:6, y:11.5, width:8.9, angle:-0.20})
-
sim.addBox({x:5.5, y:16, width:9, angle:0.20})
-
sim.addBox({x:5.5, y:18, width:9})
-
sim.addCircle({x:11, y:20, radius:2.5, groupIndex:1});
-
sim.addBox({x:16, y:19, width:2, height:2, angle:0.0, groupIndex:1})
-
}
-
-
function createTraveler(x:Number, y:Number):QuickObject{
-
var parts:Array = [];
-
parts[0] = sim.addCircle({x:0, y:1, radius:0.25, friction:0.01});
-
parts[1] = sim.addCircle({x:0, y:3, radius:0.25, friction:0.01});
-
parts[2] = sim.addBox({x:0, y:2, width:0.3, height:1.5 , groupIndex:-1});
-
return sim.addGroup({objects:parts, x:x, y:y });
-
}
-
-
sim.start();
-
sim.mouseDrag();
One of the more advanced and useful properties of rigid bodies is the groupIndex. It allows you to specify which rigid bodies collide with one another and which rigid bodies pass through one another. This snippit demo's the groupIndex property. For more information take a look at what the Box2D manual says.
Take a look at the swf here.
Actionscript:
-
[SWF(width=560,height=300,backgroundColor=0x000000,frameRate=30)]
-
-
var key:Object = new Object();
-
var alphabet:Array = "abcdefghijklmnopqrstuvwxyz".split("");
-
-
var num:Number = alphabet.length;
-
var step:Number = 360 / num;
-
-
var colors:Object = new Object();
-
for (var i:int = 0; i<num; i++){
-
var index:String = alphabet[i];
-
key[index] = 65 + i;
-
var c:Array = hsv(i * step, 1, 1);
-
colors[index] = c[0] <<16 | c[1] <<8 | c[2];
-
}
-
alphabet.push("32");
-
num++;
-
key["32"] = 32;
-
colors["32"] = 0x333333;
-
x = y = 10;
-
var count:int = 0;
-
var size:int = 20;
-
stage.addEventListener(KeyboardEvent.KEY_DOWN, onKeyPressed);
-
function onKeyPressed(evt:KeyboardEvent):void{
-
for (var i:int= 0; i<num; i++){
-
var index:String = alphabet[i];
-
if (index == "32"){
-
trace("hi", evt.keyCode, key[index]);
-
}
-
if (evt.keyCode == key[index]){
-
graphics.beginFill(colors[index]);
-
var xp:int = count % num * size;
-
var yp:int = int(count / num) * size;
-
graphics.drawRect(xp, yp, size, size);
-
count++;
-
}
-
}
-
}
-
// ported from here:
-
//http://www.cs.rit.edu/~ncs/color/t_convert.html
-
function hsv(h:Number, s:Number, v:Number):Array{
-
var r:Number, g:Number, b:Number;
-
var i:int;
-
var f:Number, p:Number, q:Number, t:Number;
-
if (s == 0){
-
r = g = b = v;
-
return [Math.round(r * 255), Math.round(g * 255), Math.round(b * 255)];
-
}
-
h /= 60;
-
i = Math.floor(h);
-
f = h - i;
-
p = v * (1 - s);
-
q = v * (1 - s * f);
-
t = v * (1 - s * (1 - f));
-
switch( i ) {
-
case 0:
-
r = v, g = t, b = p;
-
break;
-
case 1:
-
r = q, g = v, b = p;
-
break;
-
case 2:
-
r = p, g = v, b = t;
-
break;
-
case 3:
-
r = p, g = q, b = v;
-
break;
-
case 4:
-
r = t, g = p, b = v;
-
break;
-
default: // case 5:
-
r = v, g = p, b = q;
-
break;
-
}
-
return [Math.round(r * 255), Math.round(g * 255), Math.round(b * 255)];
-
}
This snippet is a typing experiment - for every letter, you type a box filled with a specific color is drawn to the stage. The color associated with each letter is determined by moving through hsv color space - so typing an alphabet will end up with something resembling a spectrum.

