Latest snippets

E4X Filtering

var userInfo:XML = <users>
  <user fname="joe" lname="smith" age="31" />
  <user fname="mildred" lname="calder" age="64" />
  <user fname="ben" lname="nathanson" age="20" />
  <user fname="james" lname="biuford" age="19" />
  <user fname="nick" lname="calhoun" age="45" />
</users>;


trace("Users over 20:n");
trace(userInfo.user.(@age > 20).toXMLString());

trace("nUsers with the name nick:n");
trace(userInfo.user.(@fname == "nick" ).toXMLString());

// use regular expressions with e4x
trace("nUsers with name starting with j:n");
trace(userInfo.user.(/^j/.test(@fname)));

/*
outputs:

Users over 20:

<user fname="joe" lname="smith" age="31"/>
<user fname="mildred" lname="calder" age="64"/>
<user fname="nick" lname="calhoun" age="45"/>

Users with the name nick:

<user fname="nick" lname="calhoun" age="45"/>

Users with name starting with j:

<user fname="joe" lname="smith" age="31"/>
<user fname="james" lname="biuford" age="19"/>

*/

One of the nicest features of E4X is filtering. The above code shows a few simple examples … the last example makes use of regular expressions — I first read using regular expressions and E4X somewhere on http://www.darronschall.com/.

I usually prefer to use a database for any kind of info I’ll be searching… but if you know you have a relatively small amount of data XML can be a fine way to go.
Isometric Voxels

// isometric conversion
var centerX:Number=stage.stageWidth/2;
var centerY:Number=stage.stageHeight/2;
var theta:Number=Math.PI/4;// 45 degrees;
var cosX:Number=Math.cos(theta);
var sinX:Number=Math.sin(theta);
var pnt:Point = new Point();
function iso3D(x:Number, y:Number, z:Number):Point {
	pnt.x = centerX + (x-z) *  cosX
	pnt.y = centerY -  (x+z) * 0.5 * sinX - y;
	return pnt;
}
// example:
var canvas:BitmapData=new BitmapData(stage.stageWidth,stage.stageHeight,true,0xFF000000);
addChild(new Bitmap(canvas,"auto",true));
var size:int=100;
var hs:int=size / 2;
var pen:Point = new Point();
var vect:Vector3D = new Vector3D();
// draw a few shapes with offset:
for (var dist:int = 10; dist <= 80; dist *= 2) {
	// voxel space:
	for (var i:int = 0; i<size; i++) {
		for (var j:int = 0; j<size; j++) {
			for (var k:int = 0; k<size; k++) {
				vect.x=j-hs;
				vect.y=i-hs;
				vect.z=k-hs;
				pen = iso3D(vect.x,vect.y,vect.z);
				if (Math.sqrt((vect.x * vect.x) + (vect.y * vect.y) + (vect.z * vect.z)) <dist) {
					// using Vector3D.distance() is very slow compared to above
					// a few types of coloring:
					var xp:Number = pen.x + (dist <<2) - 200;
					canvas.setPixel(xp, pen.y-100, (i <<16 | j <<8 | k) <<1);
					canvas.setPixel(xp, pen.y+100, (k <<16 | k <<8 | k+j)  );
				}
			}
		}
	}
}

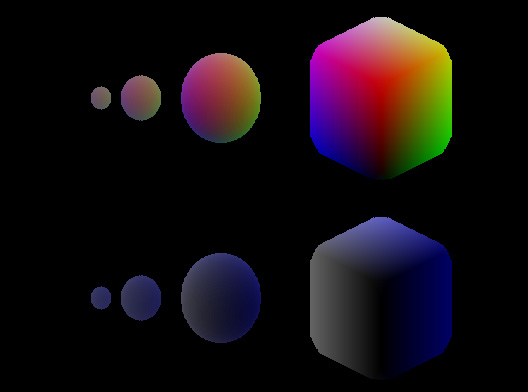
The above will draw this:

You can read more about voxels here.

This isn’t the speediest way to do voxels (especially if you want to animate). This was just the first thing that came to mind.

Blendmode Emboss

var canvas:BitmapData = new BitmapData(500, 500, true, 0xFFFFFFFF);
var color:BitmapData= new BitmapData(500, 500, true, 0x81666666);
var over:BitmapData = new BitmapData(500, 500, true, 0xFF000000);
addChild(new Bitmap(canvas, "auto", true));
var circle:Shape = new Shape();
circle.graphics.beginFill(0xFFFFFF,1);
circle.graphics.drawCircle(0,0,50);
var m:Matrix = new Matrix();
m.tx = 0;
m.ty = 1;
addEventListener(Event.ENTER_FRAME, onLoop);
function onLoop(evt:Event):void {
	circle.x = mouseX;
	circle.y = mouseY;
	canvas.draw(circle, circle.transform.matrix);
	canvas.copyPixels(color, color.rect, new Point(0,0), null, null, true);
	over.copyPixels(canvas, canvas.rect, new Point(0,0), null, null, true);
	canvas.draw(over, m, null, BlendMode.SCREEN);
	over.applyFilter(over, over.rect, new Point(-2,-2), new BlurFilter(10,10,1));
	canvas.draw(over, m, null, BlendMode.SUBTRACT);
}

Grayscale emboss technique. More info here.

Dynamic Vars Dictionary


var vars:Dictionary = new Dictionary();

var sp:Sprite = new Sprite();

// associate variables with a sprite (or any non-dynamic class)
vars[sp] = {posX:100, posY:100, velX:1, velY:1};

// read
trace(vars[sp].posX);

I’ve heard people mention that they wish the sprite class were dynamic… meaning they wish they could add methods and properties to a Sprite instance at runtime. There’s no way I know of to do this, however… the dictionary class can be used to associate variables with any non-dynamic class instance… as it does in this the above example.

The dictionary class is similar to an associative array except that instead of using strings for keys, dictionaries use object instances.

Transparent copyPixels()

var canvas:BitmapData=new BitmapData(400,400,true,0x000000);
var eraser:BitmapData=new BitmapData(400,400,true,0x00000000);
addChild(new Bitmap(canvas));
var redOval:Shape = new Shape();
with(redOval.graphics) lineStyle(0,0), beginFill(0xFF0000), drawEllipse(0,0,10,50);

// draw a background to emphasize transparency 
createBackground();

addEventListener(Event.ENTER_FRAME, onLoop);

function onLoop(evt:Event):void {
	// clear canvas so that it is completely transparent
	canvas.copyPixels(eraser, eraser.rect, new Point(0,0), eraser);
	redOval.x = mouseX;
	redOval.y = mouseY;
	redOval.rotation += 10
	// transform.matrix contains all transformation information for
	// the redOval including scaleX, scaleY, x, y, rotation etc...
	canvas.draw(redOval, redOval.transform.matrix);
}

function createBackground():void {
	for (var i:int = 0; i<100; i++){
		with(graphics) lineStyle(0,0x000000), lineTo(Math.random()*400, Math.random()*400);
	}
}

This example builds on yesterdays snippet. Instead of just allowing the red oval to be continuously drawn to the canvas BitmapData… in this example the canvas BitmapData is erased again and again before the red oval is drawn to it. To erase it with a flat color you might use BitmapData.fillRect() but if you want to erase it so that it is completely transparent you need to use BitmapData.copyPixels():

canvas.copyPixels(eraser, eraser.rect, new Point(0,0), eraser);

The eraser BitmapData is a completely transparent BitmapData object. The key here is the fourth argument…. “alphaBitmapData”.This is what causes the canvas BitmapData to become completely transparent again at the beginning of each enterFrame.

This argument is separate from the first argument (sourceBitmapData) for added flexibility.

BitmapData Brush

var canvas:BitmapData=new BitmapData(400,400,true,0xFFCCCCCC);
addChild(new Bitmap(canvas));

var redOval:Shape = new Shape();
with(redOval.graphics) lineStyle(0,0), beginFill(0xFF0000), drawEllipse(0,0,10,50);

addEventListener(Event.ENTER_FRAME, onLoop);
function onLoop(evt:Event):void {

	redOval.x = mouseX;
	redOval.y = mouseY;
	redOval.rotation += 10
	// transform.matrix contains all transformation information for 
	// the redOval including scaleX, scaleY, x, y, rotation etc...
	canvas.draw(redOval, redOval.transform.matrix);
}

A very easy way to create a BitmapData brush.

Senocular’s Two Sided 3D Clip

CLICK HERE FOR TODAY’S SNIPPET

In a recent kirupa thread, senocular posted an very useful snippet to aid in the creation of a two sided 3D MovieClip. The thread also contains an in depth description of polygon winding.

Description of Polygon Winding

I created a navigation demo using this technique.

Here is the source for the above demo

UPDATE
Justin Windle of soulwire has written a nice class called PaperSprite that uses this technique. The class is worth checking out – it’s nicely designed… read more about it here.

Gradient Glow

var colors:Array = [0xFF0000, 0x666699, 0x223322, 0xCCCCDD, 0xFFEEFF];
var alphas:Array = [0, 1, 1, 1, 1];
var ratios:Array = [0, 50, 100, 200, 255]
var filter:GradientGlowFilter = new GradientGlowFilter(0, 0, colors, alphas, ratios, 30, 30, 1, 2, "full", true);
 
var circles:Shape = new Shape();

 for (var i:int = 0; i<30; i++){
  with(circles.graphics) beginFill(0xFF0000), drawCircle(Math.random()*500, Math.random()*400,10+Math.random()*40);
 }
 addChild(circles);
 
 circles.filters = [filter];

I don’t see GradientGlowFilter used much. But with some tweaking you can probably get some decent stuff out of it.

Bring Display Object to Top

mc.addEventListener(MouseEvent.ROLL_OVER, onRollOver);
function onRollOver(evt:MouseEvent):void {
  addChild(MovieClip(evt.currentTarget));
}

This one is very simple, but it’s important to note that using addChild() on something that is already on the display list simply brings it to the top. Back in AS2 we used to do:

mc.swapDepths(1000);

Procedural Pattern – Navigation

var currentBtn:MovieClip;

var nav:Sprite = new Sprite();
nav.x = nav.y = 20;
addChild(nav);

createBtns();

nav.addEventListener(MouseEvent.CLICK, onClickBtn);

function createBtns():void{
	for (var i:int = 0; i<10; i++){
		var btn:MovieClip = new MovieClip();
		with(btn.graphics) beginFill(0x666666), drawRect(-10,-10,20,20);
		btn.x = i * (btn.width + 10);
		btn.buttonMode = true;
		btn.num = i;
		btn.alpha = .5;
		nav.addChild(btn);
	}
}

function onClickBtn(evt:MouseEvent):void {
	//
	// this is the important part
	//
	if (currentBtn){
		currentBtn.scaleX = currentBtn.scaleY = 1;
		currentBtn.alpha = .5;
	}
	currentBtn = MovieClip(evt.target);
	currentBtn.scaleX = currentBtn.scaleY = 1.3;
	currentBtn.alpha = 1;
	trace("current button:", currentBtn.num);
	//
}

This code will create 10 boxes that represent buttons on a navigation. When you click a box it indicates that it is selected by scaling up and changing alpha. Simple enough…

The term Procedural Pattern is just a spin on the idea of Design Patterns. I’ve come up with lots of small patterns to solve simple recurring problems over the years. Most of these relate to things like drawing programs, ecards and games.