Latest snippets

24hr Clock

var clock:Sprite = Sprite(addChild(new Sprite()));
clock.x = clock.y = 150;

var bg:Shape = Shape(clock.addChild(new Shape()));
with (bg.graphics) lineStyle(2, 0x666666), beginFill(0xEFEFEF), drawCircle(0,0,110);

var hHand:Shape = clockHand(6, 50);
var mHand:Shape = clockHand(2, 80);
var sHand:Shape = clockHand(1, 90);

var center:Shape = Shape(clock.addChild(new Shape()));
with (center.graphics) beginFill(0x000000), drawCircle(0,0,5);

var hInc:Number = 360/24;
var msInc:Number = 360/60 ;
var nOff:Number = 6;
var verdana:TextFormat = new TextFormat("Verdana", 8);
// add numbers to clock
for (var i:int = 0; i<24; i++){
	 var ang:Number = (i * hInc - 90) * Math.PI/180;
	 createNumber(70,ang, i.toString());
	 var ms:Number = i * 2.5;
	 if (ms % 5 == 0){
		createNumber(95, ang, ms.toString());
	 }
}
 
addEventListener(Event.ENTER_FRAME, onLoop);
function onLoop(evt:Event):void {
	var date:Date = new Date();
	hHand.rotation =  hInc * date.getHours();
	mHand.rotation =  msInc * date.getMinutes();
	sHand.rotation =  msInc * date.getSeconds();
}

function clockHand(thickness:Number, leng:Number):Shape{
	var hand:Shape = Shape(clock.addChild(new Shape()));
	with (hand.graphics) {
		lineStyle(thickness, 0x000000, 1, true, LineScaleMode.NORMAL, CapsStyle.SQUARE);
		lineTo(0,-leng);
	}
	return hand;
}

function createNumber(radius:Number, theta:Number, str:String):void{
    var t:TextField = TextField(clock.addChild(new TextField()));
	with (t) defaultTextFormat = verdana, t.autoSize = "left";
	t.text = str;
	t.x = radius * Math.cos(theta) - nOff;
	t.y = radius* Math.sin(theta) - nOff;
}

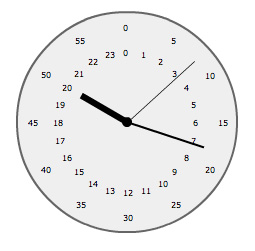
I was watching a movie the other day and I saw a 24 hour clock in the background of one of the shots. After the movie I coded this snippet. It draws a very basic clock with an hour hand that takes 24 hours to go full circle…
Square Bracket Syntax & Typecasting

addChild(new TextField());
getChildAt(0)["text"] = "Hello World";

Notice that square bracket syntax makes it so we don’t need to typecast. Take a look at the other way:

addChild(new TextField());
TextField(getChildAt(0)).text = "Hello World";

Typecasting is the way to go…. the square bracket technique is just an interesting trick.

I wrote this after somehow stumbling on this very entertaining page – it shows hello world written in approximately 200 different languages…

Snap to Grid

[SWF(width = 600, height = 400)]

// draw the same grid as yesterday
var tileSize:int = 40;
var cols:int = stage.stageWidth / tileSize;
var rows:int = stage.stageHeight / tileSize;
var grid:Sprite = Sprite(addChild(new Sprite()));
grid.graphics.lineStyle(0,0x000000);
var i:int = 0;
for (i = 1; i<cols; i++){
	var posX:Number = i * tileSize
	grid.graphics.moveTo(posX, 0);
	grid.graphics.lineTo(posX, stage.stageHeight);
}
for (i = 1; i<rows; i++){
	var posY:Number = i * tileSize
	grid.graphics.moveTo(0, posY);
	grid.graphics.lineTo(stage.stageWidth, posY);
}

//
// -- add a circle that snaps to the grid when dragged
//
var circle:Sprite = Sprite(addChild(new Sprite()));
with (circle.graphics) beginFill(0xFF0000), drawCircle(0,0,10);
circle.x = circle.y =  tileSize * 3;
circle.buttonMode = true;

circle.addEventListener(MouseEvent.MOUSE_DOWN, onDown);
function onDown(evt:MouseEvent):void {
	addEventListener(Event.ENTER_FRAME, onRunSnapping);
}

function onRunSnapping(evt:Event):void {
	circle.x =  Math.round(mouseX / tileSize) * tileSize;
	circle.y =  Math.round(mouseY / tileSize) * tileSize;
}

stage.addEventListener(MouseEvent.MOUSE_UP, onUp);
function onUp(evt:MouseEvent):void {
	removeEventListener(Event.ENTER_FRAME, onRunSnapping);
}

This builds on yesterdays post by adding a draggable red circle that snaps to the grid. This is the real trick:

circle.x =  Math.round(mouseX / tileSize) * tileSize;
circle.y =  Math.round(mouseY / tileSize) * tileSize;

Stage Grid

// try changing the size of  the stage
[SWF(width = 600, height = 400)]

// try changing the tile size (make sure swf width and height are evenly divisible by this number)
var tileSize:int = 20;


var cols:int = stage.stageWidth / tileSize;
var rows:int = stage.stageHeight / tileSize;

var grid:Sprite = Sprite(addChild(new Sprite()));
grid.graphics.lineStyle(0,0x000000);

var i:int = 0;

for (i = 1; i<cols; i++){
	var posX:Number = i * tileSize
	grid.graphics.moveTo(posX, 0);
	grid.graphics.lineTo(posX, stage.stageHeight);
}
for (i = 1; i<rows; i++){
	var posY:Number = i * tileSize
	grid.graphics.moveTo(0, posY);
	grid.graphics.lineTo(stage.stageWidth, posY);
}

This is a quick way to fill the stage with a grid. I like my grids to have square tiles with sizes like 5×5, 10×10 20×20 etc…. So as long as you make sure that you’re swf width and height are evenly divisible by your tileSize, this snippet will work nicely.

Tausworthe Random Numbers (seeded)

// best thing about this are the random seeds
var s1:Number= 0xFFFFFF;
var s2:Number = 0xCCCCCC;
var s3:Number= 0xFF00FF;

// saw this algorithm on this somewhat annoying thread:
// http://www.reddit.com/r/programming/comments/7yjlc/why_you_should_never_use_rand_plus_alternative/
// additional googling brought me to this: http://wakaba.c3.cx/soc/kareha.pl/1100499906/
// and finally to this ( didn't understand most of this one) www.ams.org/mcom/1996-65-213/S0025-5718-96-00696-5/S0025-5718-96-00696-5.pdf

function rand():Number {
	s1=((s1&4294967294)<<12)^(((s1<<13)^s1)>>19);
	s2=((s2&4294967288)<<4)^(((s2<<2)^s2)>>25);
	s3=((s3&4294967280)<<17)^(((s3<<3)^s3)>>11);
	var r:Number = (s1^s2^s3) * 2.3283064365e-10;
	r = (r<0) ? r+=1 : r;
	return r;
}

// see a visual comparison between this and actionscript's Math.random()

var canvas:BitmapData = new BitmapData(400,400,false, 0xCCCCCC);
addChild(new Bitmap(canvas));

var posX:Number;
var posY:Number;

addEventListener(Event.ENTER_FRAME, onLoop);

function onLoop(evt:Event):void {

	for (var i:int = 0; i<100; i++){
		posX = rand() * 180
		posY = rand() * 180
		canvas.setPixel( 100 + posX, 10 + posY, 0x000000);
	}
	
	for (i = 0; i<100; i++){
		posX = Math.random() * 180
		posY = Math.random() * 180
		canvas.setPixel( 100 + posX, 210 + posY, 0x000000);
	}
}

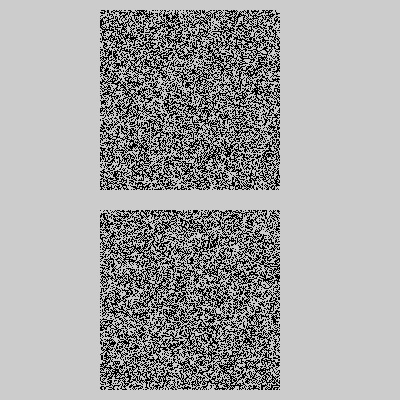
The above snippet demo’s an alternative random number generator that uses the Tausworthe method.


Top square is Tausworthe and bottom is Math.random()

I don’t actually know much about this, or fully understand how it works. I just saw it on a random reddit thread, googled about it for a few minutes and then ported it to actionscript.

There’s lots of talk about what the BEST random number generator is…. which one is the fastest, which one is the most random. etc… I don’t really know much about that, especially since I’m just playing around with code and I don’t need a RNG for some scientific experiment. For me, what’s nice about this approach is the three random seeds. For some reason, Math.random() doesn’t have a place where you can enter a seed for random numbers. Random seeds are very useful when you want to do something random but want to be able to replicate the random results at a later time. For instance:

var s1:Number= 0xFFFFFF;
var s2:Number = 0xCCCCCC;
var s3:Number= 0xFF00FF;

trace("first three values:");
trace(rand());
trace(rand())
trace(rand())

s1 = 0xFF;
s2 = 0xEFEFEF;
s3 = 19008;

trace("nfirst three values with different seeds:");
trace(rand());
trace(rand())
trace(rand())

s1 = 0xFFFFFF;
s2  = 0xCCCCCC;
s3 = 0xFF00FF;

trace("noriginal three values:");
trace(rand());
trace(rand())
trace(rand())

function rand():Number {
	s1=((s1&4294967294)<<12)^(((s1<<13)^s1)>>19);
	s2=((s2&4294967288)<<4)^(((s2<<2)^s2)>>25);
	s3=((s3&4294967280)<<17)^(((s3<<3)^s3)>>11);
	var r:Number = (s1^s2^s3) * 2.3283064365e-10;
	r = (r<0) ? r+=1 : r;
	return r;
}

/*
outputs:
first three values:
0.051455706589931385
0.050584114155822715
0.417276361484596

first three values with different seeds:
0.6032885762463134
0.9319786790304015
0.8631882804934321

original three values:
0.051455706589931385
0.050584114155822715
0.417276361484596
*/

I stumbled upon a bunch of other random number algorithms, maybe I’ll throw them in a class in the next couple days.

Dial UI, Record Scratch etc…

var angOffset:Number = 0;
var percent:Number  = 0;

var dial:Sprite = Sprite(addChild(new Sprite()));
with(dial.graphics) lineStyle(1, 0x000000), beginFill(0xCCCCCC), drawCircle(0,0,100), lineTo(0,0);
dial.x = stage.stageWidth / 2;
dial.y = stage.stageHeight / 2;

dial.addEventListener(MouseEvent.MOUSE_DOWN, onDialDown);
stage.addEventListener(MouseEvent.MOUSE_UP, onStageUp);
function onDialDown(evt:MouseEvent):void {
	calcOffset();
	dial.addEventListener(Event.ENTER_FRAME, onRotateDial);
}

function calcOffset():void {
	angOffset = Math.atan2(mouseY - dial.y, mouseX - dial.x) / Math.PI * 180 - dial.rotation;
}

function onRotateDial(evt:Event):void {
	dial.rotation =  Math.atan2(mouseY - dial.y, mouseX - dial.x) / Math.PI * 180 - angOffset;
	percent = dial.rotation;
	if (percent < 0){
		percent += 360;
	}
	percent /= 360;
	// range 0 - 1
	trace(percent);
}

function onStageUp(evt:Event):void {
	dial.removeEventListener(Event.ENTER_FRAME, onRotateDial);
}

The above shows the meat of what you need to create some kind of dial UI… this would also work well if you need to create an interactive turntable (record scratching etc…).

Everytime I needed to create dials for UI, the client wanted left -> right mouse motion rather than a circular… like what you see in Reason. Someone recently asked me how to do a circular motion style dial and this is the technique I came up with.

lineTo() w/ drawCircle()

var dial:Sprite = Sprite(addChild(new Sprite()));
with(dial.graphics) lineStyle(1, 0x000000), beginFill(0xCCCCCC), drawCircle(0,0,100), lineTo(0,0);
dial.x = stage.stageWidth / 2;
dial.y = stage.stageHeight / 2;

This snippet shows how you can combine drawCircle() and lineTo() to quickly draw a clock/dial primitive shape. I’ll use this in tomorrows snippet…

(HSV HSB) to RGB

[SWF(width=720,height=360,backgroundColor=0x000000,frameRate=30)]

// ported from here:
//http://www.cs.rit.edu/~ncs/color/t_convert.html

function hsv(h:Number, s:Number, v:Number):Array{
	var r:Number, g:Number, b:Number;
	var i:int;
	var f:Number, p:Number, q:Number, t:Number;
	 
	if (s == 0){
		r = g = b = v;
		return [Math.round(r * 255), Math.round(g * 255), Math.round(b * 255)];
	}
	
	h /= 60;
	i  = Math.floor(h);
	f = h - i;
	p = v *  (1 - s);
	q = v * (1 - s * f);
	t = v * (1 - s * (1 - f));
	
	switch( i ) {
		case 0:
			r = v;
			g = t;
			b = p;
			break;
		case 1:
			r = q;
			g = v;
			b = p;
			break;
		case 2:
			r = p;
			g = v;
			b = t;
			break;
		case 3:
			r = p;
			g = q;
			b = v;
			break;
		case 4:
			r = t;
			g = p;
			b = v;
			break;
		default:		// case 5:
			r = v;
			g = p;
			b = q;
			break;
	}
	return [Math.round(r * 255), Math.round(g * 255), Math.round(b * 255)];
}


//
//  -- test it out by drawing a few things
//

var canvas:BitmapData = new BitmapData(720, 360, false, 0x000000);

addChild(new Bitmap(canvas));
 
canvas.lock();
var size:int = canvas.width * canvas.height;
var xp:int, yp:int, c:Array, i:int;

for (i = 0; i<size; i++){
	xp = i % 360;
	yp = i / 360;
	c =  hsv(xp, 1, yp / 360);
	canvas.setPixel(xp, yp, c[0] << 16 | c[1] << 8 | c[2]);
}

var dx:Number, dy:Number, dist:Number, ang:Number;

for (i = 0; i<size; i++){
	xp = i % 360;
	yp = i / 360;
	dx = xp - 180;
	dy = yp - 180;
	dist = 1 - Math.sqrt((dx * dx) + (dy * dy)) / 360;
	ang = Math.atan2(dy, dx) / Math.PI * 180;
	if (ang < 0){
		ang += 360;
	}
	c =  hsv(ang, 1, dist);
	canvas.setPixel(360 + xp, yp, c[0] << 16 | c[1] << 8 | c[2]);
}
canvas.unlock();

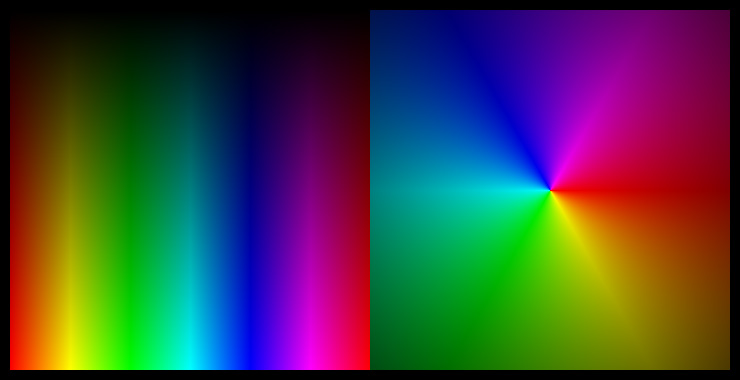
This is one of those things I’ve been meaning to play with for awhile. The above demos a function called hsv() which takes 3 arguments: angle (0-360), saturation(0-1) and value(0-1). The function returns an array of rgb values each with a range of (0-255).

There’s some room for optimization here, but for clarity I left as is. Even just playing with HSV (also know as HSB) for a few minutes, I see some interesting potential for dynamically generating color palettes for generative style experiments.

I looked around for the most elegant looking code snippet to port in order to write this… I eventually stumbled upon this great resource.

If you test the above on your timeline it will generate this image:

I usually only post one snippet a day… not sure why I decided to post two today.

Math.min() Math.max() …rest

trace("min", Math.min(100, 99, 32, 75, 44, 90));
trace("max", Math.max(100, 99, 32, 75, 44, 90));
/*outputs:
32
100
*/

It’s easy not to notice that Math.min() and Math.max() can take any number of arguments. I’ve seen people nest min/max calls instead of using the above option…. like this:

trace(Math.min(1, Math.min(2, 3)));

Simple BlendMode Nav

stage.frameRate=30;
var nav:Sprite = Sprite(addChild(new Sprite()));
nav.x=nav.y=150;

var cover:Sprite;
var coverDest:Number=0;
var spacing:int=4;
var btnNum:int=6;

buildNav();

addEventListener(Event.ENTER_FRAME, onLoop);

function onLoop(evt:Event):void {
	cover.x += (coverDest - cover.x) /4;
}

function buildNav():void {
	for (var i:int = 0; i<btnNum; i++) {
		var b:Sprite=makeBox(50,50);
		b.x = i * (b.width + spacing);
		b.buttonMode=true;
		b.addEventListener(MouseEvent.CLICK, onClick);
	}
	cover=makeBox(54, 60);
	cover.blendMode=BlendMode.INVERT;
}

function onClick(evt:MouseEvent):void {
	coverDest=evt.currentTarget.x;
}

function makeBox(w:Number, h:Number) {
	var b:Sprite = new Sprite();
	with (b.graphics) {
		beginFill(0x000000),drawRect(-w/2,-h/2,w,h);
	}
	nav.addChild(b);
	return b;
}

This is something I do in my intermediate flash classes… the only difference is that we do the graphics in the flash IDE during class time instead of drawing them with ActionScript.