Browse the notebook

Category: graphics algorithms

Catmull-Rom Spline

var canvas:BitmapData = new BitmapData(400,400,false, 0x000000);
addChild(new Bitmap(canvas));

var p0:Sprite = dot(100, 100);
var p1:Sprite = dot(120, 180);
var p2:Sprite = dot(220, 180);
var p3:Sprite = dot(250, 250);

addEventListener(Event.ENTER_FRAME, onLoop);
function onLoop(evt:Event):void {
	canvas.lock();   
	canvas.fillRect(canvas.rect, 0x000000);

	curve(p0, p1, p2, p3);
	canvas.unlock();
}


// all math from http://en.wikipedia.org/wiki/Cubic_Hermite_spline
function curve(p0:Sprite, p1:Sprite, p2:Sprite, p3:Sprite, rez:Number=.02):void{
	var px:Number = 0;
    var py:Number = 0;
	var m0:Point = tangent(p1, p0);
	var m1:Point = tangent(p2, p0);
	var m2:Point = tangent(p3, p1);
	var m3:Point = tangent(p3, p2);
	
	for (var t:Number = 0; t < 1; t+=rez){
		 var t_2:Number = t * t;
		 var _1_t:Number = 1 - t;
		 var _2t:Number = 2 * t;
		 
		 var h00:Number =  (1 + _2t) * (_1_t) * (_1_t);
		 var h10:Number =  t  * (_1_t) * (_1_t);
		 var h01:Number =  t_2 * (3 - _2t);
		 var h11:Number =  t_2 * (t - 1);
		 
		 px = h00 * p0.x + h10 * m0.x + h01 * p1.x + h11 * m1.x;
		 py = h00 * p0.y + h10 * m0.y + h01 * p1.y + h11 * m1.y;
		 canvas.setPixel(px, py, 0xFFFFFF);
		 
		 px = h00 * p1.x + h10 * m1.x + h01 * p2.x + h11 * m2.x;
		 py = h00 * p1.y + h10 * m1.y + h01 * p2.y + h11 * m2.y;
		 canvas.setPixel(px, py, 0xFFFFFF);
		 
		 px = h00 * p2.x + h10 * m2.x + h01 * p3.x + h11 * m3.x;
		 py = h00 * p2.y + h10 * m2.y + h01 * p3.y + h11 * m3.y;
		 canvas.setPixel(px, py, 0xFFFFFF);
	}
}

function tangent(pk1:Sprite, pk_1:Sprite){
	return new Point((pk1.x - pk_1.x) / 2, (pk1.y - pk_1.y) / 2);
}

// draggable dot
function dot(xp:Number, yp:Number, col:uint = 0x507399, rad:Number=5):Sprite {
	var s:Sprite = Sprite(addChild(new Sprite));
	s.x = xp;
	s.y = yp;
	with(s.graphics) beginFill(col), drawCircle(0,0,rad);
	s.buttonMode = true;
	s.addEventListener(MouseEvent.MOUSE_DOWN, onDrag);
	return s;
}
function onDrag(evt:MouseEvent):void {
	evt.currentTarget.startDrag()
}
stage.addEventListener(MouseEvent.MOUSE_UP, onUp);
function onUp(evt:MouseEvent):void{
	stopDrag();
}

This is snippet draws a Catmull-Rom spline based on 4 control points. A nice feature of Catmull-Rom splines is that they always pass through each of their control points.
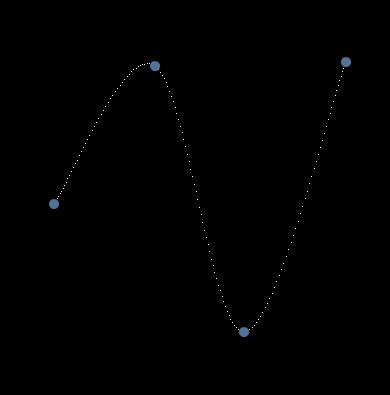

have a look at the swf here:

I first learned about Catmull-Rom splines somewhere in the processing forums.

I got all my info for this snippet from this wikipedia page.

There is a good deal of room for optimization here… I may post an optimized version in the future.
Read snippet: Catmull-Rom Spline

Cubic Hermite Spline

var canvas:BitmapData = new BitmapData(400,400,false, 0x000000);
addChild(new Bitmap(canvas));

// create some draggable dots
var p0:Sprite = dot(100, 100);
var p1:Sprite = dot(200, 200);
var m0:Sprite = dot(200, 100, 0xFFFFFF, 3)
var m1:Sprite = dot(100, 200, 0xFFFFFF, 3);

addEventListener(Event.ENTER_FRAME, onLoop);
function onLoop(evt:Event):void {
	canvas.fillRect(canvas.rect, 0x000000);
	var px:Number = 0;
	var py:Number = 0;
	for (var t:Number = 0; t <1; t+=.01){
		var t_2:Number = t * t;
		var t_3:Number = t_2 * t;
		
		// some repetitive math for clarity
		px = (2 * t_3  - 3 * t_2 + 1) * p0.x +(t_3 - 2 * t_2 + t) *
				 m0.x + (-2 * t_3 + 3 * t_2) * p1.x + (t_3 - t_2) * m1.x;
		py = (2 * t_3  - 3 * t_2 + 1) * p0.y +(t_3 - 2 * t_2 + t) *
				 m0.y + (-2 * t_3 + 3 * t_2) * p1.y + (t_3 - t_2) * m1.y;
		canvas.setPixel(px, py, 0xFF0000);
	}
}
// draggable dot
function dot(xp:Number, yp:Number, col:uint = 0x507399, rad:Number=5):Sprite {
	var s:Sprite = Sprite(addChild(new Sprite()));
	s.x = xp;
	s.y = yp;
	with(s.graphics) beginFill(col), drawCircle(0,0,rad);
	s.buttonMode = true;
	s.addEventListener(MouseEvent.MOUSE_DOWN, onDrag);
	return s;
}
function onDrag(evt:MouseEvent):void {
	evt.currentTarget.startDrag()
}
stage.addEventListener(MouseEvent.MOUSE_UP, onUp);
function onUp(evt:MouseEvent):void{
	stopDrag();
}

This is the start of my exploration of Cubic Hermite Splines (like Catmull–Rom)… I wrote this snippet while skimming the wikipedia article on the subject…. at first I wasn’t sure if this was correct, but I added tangent calculations for a Catmull-Rom and it worked nicely… will post that tomorrow.

Read snippet: Cubic Hermite Spline

Slow Line Drawing

var canvas:BitmapData = Bitmap(addChild(new Bitmap(new BitmapData(400, 400, false, 0x000000)))).bitmapData;

function line(x1:Number, y1:Number, x2:Number, y2:Number, res:int=10):void{
	var dx:Number = x2 - x1;
	var dy:Number = y2 - y1;
	var dist:Number = Math.sqrt((dx * dx) + (dy * dy));
	var step:Number = 1 / (dist / res);
	for (var i:Number = 0; i<=1; i+= step){
		// lerp : a  + (b - a) * f
		canvas.setPixel(x1 + dx * i, y1 + dy * i, 0xFFFFFF);
	}
}

addEventListener(Event.ENTER_FRAME, onLoop);
function onLoop(evt:Event):void {
   canvas.fillRect(canvas.rect, 0x000000);
  line(100 , 100, mouseX, mouseY,1);
  line(100 + 50, 100, mouseX+ 50, mouseY,5);
}

Yesterday I posted an implementation of the Bresenham Line Algorithm. Today I’m posting a comparatively slow way to draw a line with setPixel(). This snippet uses lerp and the Pythagorean theorem. It works nicely for small numbers of lines, its easy to draw dotted lines with it and its easy to explain. In a real app where you needed to use setPixel() to draw a line you should use one of the fast algorithms like Wu or Bresenham.

I didn’t originally write this snippet to use set pixel… a few weeks ago I wrote something very similar to calculate a set of x y coords between two given points. In the program I used it in speed wasn’t an issue (as I only needed to run the function one time). I’ve needed this kind of function many times before in games and small apps…

This was the original:

function calculatePoints(x1:Number, y1:Number, x2:Number, y2:Number, res:int=10):Array{
	var points:Array = new Array();
	var dx:Number = x2 - x1;
	var dy:Number = y2 - y1;
	var dist:Number = Math.sqrt((dx * dx) + (dy * dy));
	var step:Number = 1 / (dist / res);
	for (var i:Number = 0; i<=1; i+= step){
		points.push(new Point(x1 + dx * i, y1 + dy * i));
	}
	return points;
}

trace(calculatePoints(0,0,100,0,10));
/* outputs:
(x=0, y=0),(x=10, y=0),(x=20, y=0),(x=30.000000000000004, y=0),(x=40, y=0),(x=50, y=0),(x=60, y=0),(x=70, y=0),(x=80, y=0),(x=89.99999999999999, y=0),(x=99.99999999999999, y=0)
*/

…and another version to allow you to specify the number of points to calculate rather than the pixel interval at which they should be calculated:

function calculatePoints(x1:Number, y1:Number, x2:Number, y2:Number, pointNum:int=10):Array{
	var points:Array = new Array();
	var step:Number = 1 / (pointNum + 1);
	for (var i:Number = 0; i<=1; i+= step){
		points.push(new Point(x1 + (x2 - x1) * i, y1 + (y2 - y1) * i));
	}
	return points;
}

trace(calculatePoints(0,30,30,0,1));
/* outputs:
(x=0, y=30),(x=15, y=15),(x=30, y=0)
*/

This last version isn’t perfect, sometimes the pointNum will be off by 1, I may fix that in a future post.

Read snippet: Slow Line Drawing

Bresenham line

var canvas:BitmapData = Bitmap(addChild(new Bitmap(new BitmapData(400,400, false, 0x000000)))).bitmapData;

drawLine(10,10,100,90, 0xFF0000);
drawLine(100,90,60,80, 0xFF0000);
drawLine(100,90,95,60, 0xFF0000);
	
for (var i:int = 0; i<100; i+=1){
    drawLine(i *4, 100 + i, 200, 390);
}
// code ported from here:
// http://www.edepot.com/linebenchmark.html
function drawLine(x1:int, y1:int, x2:int, y2:int, col:uint = 0xFFFFFF){
	var x:int, y:int;
    var dx:int, dy:int;
	var incx:int , incy:int
	var balance:int;

	if (x2 >= x1){
		dx = x2 - x1;
		incx = 1;
	}else{
		dx = x1 - x2;
		incx = -1;
	}

	if (y2 >= y1){
		dy = y2 - y1;
		incy = 1;
	}else{
		dy = y1 - y2;
		incy = -1;
	}

	x = x1;
	y = y1;

	if (dx >= dy){
		dy <<= 1;
		balance = dy - dx;
		dx <<= 1;

		while (x != x2){
			canvas.setPixel(x, y, col);
			if (balance >= 0){
				y += incy;
				balance -= dx;
			}
			balance += dy;
			x += incx;
		} 
		canvas.setPixel(x, y, col);
	}else{
		dx <<= 1;
		balance = dx - dy;
		dy <<= 1;

		while (y != y2){
			canvas.setPixel(x, y, col);
			if (balance >= 0){
				x += incx;
				balance -= dy;
			}
			balance += dx;
			y += incy;
		} 
		canvas.setPixel(x, y, col);
	}
}

This snippet shows Brensenham’s line drawing algorithm. I ported this implementation from here… all the line algorithms in that link are easy to port to actionscript. I’ve messed with them all at some point.

Tomorrow I’m going to post a super slow line drawing algorithm… so I figured I’d post a fast line drawing algorithm today.

Read snippet: Bresenham line

(HSV HSB) to RGB

[SWF(width=720,height=360,backgroundColor=0x000000,frameRate=30)]

// ported from here:
//http://www.cs.rit.edu/~ncs/color/t_convert.html

function hsv(h:Number, s:Number, v:Number):Array{
	var r:Number, g:Number, b:Number;
	var i:int;
	var f:Number, p:Number, q:Number, t:Number;
	 
	if (s == 0){
		r = g = b = v;
		return [Math.round(r * 255), Math.round(g * 255), Math.round(b * 255)];
	}
	
	h /= 60;
	i  = Math.floor(h);
	f = h - i;
	p = v *  (1 - s);
	q = v * (1 - s * f);
	t = v * (1 - s * (1 - f));
	
	switch( i ) {
		case 0:
			r = v;
			g = t;
			b = p;
			break;
		case 1:
			r = q;
			g = v;
			b = p;
			break;
		case 2:
			r = p;
			g = v;
			b = t;
			break;
		case 3:
			r = p;
			g = q;
			b = v;
			break;
		case 4:
			r = t;
			g = p;
			b = v;
			break;
		default:		// case 5:
			r = v;
			g = p;
			b = q;
			break;
	}
	return [Math.round(r * 255), Math.round(g * 255), Math.round(b * 255)];
}


//
//  -- test it out by drawing a few things
//

var canvas:BitmapData = new BitmapData(720, 360, false, 0x000000);

addChild(new Bitmap(canvas));
 
canvas.lock();
var size:int = canvas.width * canvas.height;
var xp:int, yp:int, c:Array, i:int;

for (i = 0; i<size; i++){
	xp = i % 360;
	yp = i / 360;
	c =  hsv(xp, 1, yp / 360);
	canvas.setPixel(xp, yp, c[0] << 16 | c[1] << 8 | c[2]);
}

var dx:Number, dy:Number, dist:Number, ang:Number;

for (i = 0; i<size; i++){
	xp = i % 360;
	yp = i / 360;
	dx = xp - 180;
	dy = yp - 180;
	dist = 1 - Math.sqrt((dx * dx) + (dy * dy)) / 360;
	ang = Math.atan2(dy, dx) / Math.PI * 180;
	if (ang < 0){
		ang += 360;
	}
	c =  hsv(ang, 1, dist);
	canvas.setPixel(360 + xp, yp, c[0] << 16 | c[1] << 8 | c[2]);
}
canvas.unlock();

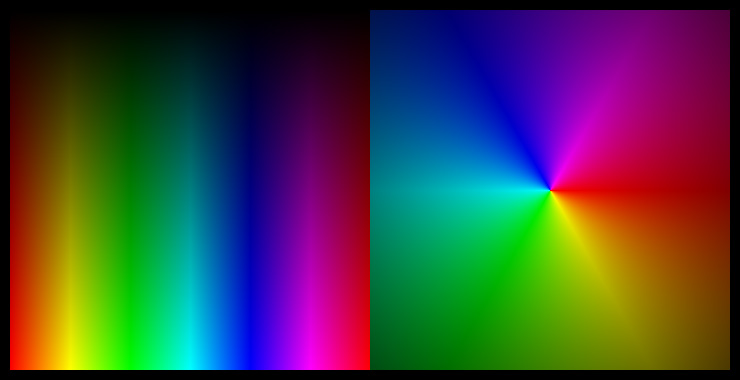
This is one of those things I’ve been meaning to play with for awhile. The above demos a function called hsv() which takes 3 arguments: angle (0-360), saturation(0-1) and value(0-1). The function returns an array of rgb values each with a range of (0-255).

There’s some room for optimization here, but for clarity I left as is. Even just playing with HSV (also know as HSB) for a few minutes, I see some interesting potential for dynamically generating color palettes for generative style experiments.

I looked around for the most elegant looking code snippet to port in order to write this… I eventually stumbled upon this great resource.

If you test the above on your timeline it will generate this image:

I usually only post one snippet a day… not sure why I decided to post two today.

Read snippet: (HSV HSB) to RGB

Animate Along Bezier Curve

var circle:Shape = Shape(addChild(new Shape));
with(circle.graphics) beginFill(0x000000), drawCircle(0,0,5);
 
var bezierPoint:Point = new Point();
function bezier(a:Number, x1:Number, y1:Number, x2:Number, y2:Number, x3:Number, y3:Number):void {
		var b:Number =1-a;
		var pre1:Number=a*a;
		var pre2:Number=2*a*b;
		var pre3:Number=b*b;
		bezierPoint.x = pre1*x1 + pre2*x2  + pre3*x3;
	    bezierPoint.y = pre1*y1 + pre2*y2 + pre3*y3;
}

var inc:Number = 0;
var theta:Number = 0;

addEventListener(Event.ENTER_FRAME, onLoop);
function onLoop(evt:Event):void {
	
	 graphics.clear();
	 graphics.lineStyle(0,0xFF0000);
     graphics.moveTo(200,200);
     graphics.curveTo(mouseX, mouseY, 400, 200);

	theta+= .05;
	inc = .5 + .5*Math.sin(theta);
 
	bezier(inc, 200, 200, mouseX, mouseY, 400, 200);
	circle.x = bezierPoint.x;
	circle.y = bezierPoint.y;
}

The above animates a circle along a quadratic bezier curve. This snippet was written in response to a question spurned by some of the recent bezier posts. I used Math.sin() to animate the circle but you could just as easily use modulus… simply replace lines 25-26 with the following:

inc += .03;
inc %= 1;
Read snippet: Animate Along Bezier Curve

Seamless Tiles

[SWF(width=600, height=500, backgroundColor=0xFFFFFF, frameRate=30)]

function seamlessTile(img:BitmapData, featherSize:Number = 5):BitmapData{
	var pnt:Point = new Point(0,0);
	var tile:BitmapData = new BitmapData(img.width, img.height, true, 0xFF000000);
	tile.copyPixels(img, img.rect, pnt, null, null, true);
	
	var flipped:BitmapData = new BitmapData(img.width, img.height, true, 0xFF000000);
	var m:Matrix = new Matrix();
	m.scale(-1, 1);
	m.translate(tile.width,0);
	flipped.draw(tile, m);
	
	var aChannel:BitmapData = new BitmapData(img.width, img.height, true, 0x00000000);
	var grad:Sprite = new Sprite();
	m.createGradientBox(img.width, img.height, 0, 0, 0);
	
	grad.graphics.beginGradientFill(GradientType.LINEAR, [0xFFFFFF, 0xFFFFFF],  [1, 0], [0, (255 / img.width) * img.width / featherSize], m, SpreadMethod.PAD);
	
	grad.graphics.drawRect(0,0,img.width, img.height);
	aChannel.draw(grad);
 
	tile.copyPixels(flipped, flipped.rect, pnt, aChannel, pnt, true);
	
	m.identity();
	m.scale(1, -1);
	m.translate(0,tile.height);
	flipped.draw(tile, m)
	
	aChannel.fillRect(aChannel.rect, 0x00000000);
	m.createGradientBox(img.width, img.height, Math.PI / 2, 0, 0);
	grad.graphics.clear();
	grad.graphics.beginGradientFill(GradientType.LINEAR, [0xFFFFFF, 0xFFFFFF], [1, 0], [0, (255 / img.height) * img.height / featherSize],  m, SpreadMethod.PAD);
	
	grad.graphics.drawRect(0,0,img.width, img.height);
	aChannel.draw(grad, grad.transform.matrix);
	
	tile.copyPixels(flipped, flipped.rect, pnt, aChannel, pnt, true);
	return tile;
}

// test out the function:
var canvas:BitmapData = new BitmapData(600, 470, true, 0xFF000000);
addChild(new Bitmap(canvas));

var image:Loader = new Loader();
image.load(new URLRequest("https://actionsnippet.com/imgs/paper.jpg"));
image.contentLoaderInfo.addEventListener(Event.COMPLETE, onLoaded);
var texture:BitmapData;

function onLoaded(evt:Event):void {
	texture =  Bitmap(image.content).bitmapData;
	addEventListener(Event.ENTER_FRAME, onLoop);
	image.removeEventListener(Event.COMPLETE, onLoaded);
}

function onLoop(evt:Event):void{
	var tile:BitmapData = seamlessTile(texture, Math.max(1,mouseX/30));
	var p:Point = new Point();
	for (var i:int = 0; i<8; i++){
		p.x = (i % 4) * tile.width;
		p.y = int(i / 4) * tile.height;
		canvas.copyPixels(tile, tile.rect, p);
	}
}

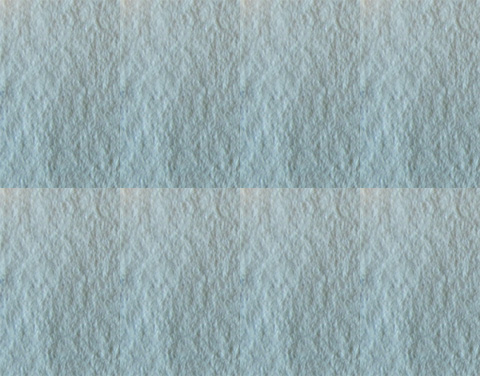
The above demos a function called seamlessTile() which takes a BitmapData object and uses an oldschool seamless tile technique on it.

The result is that you can have an image that would normally tile like this:


end up looking like this:


You can take a look at the swf here.

I learned how seamless tiles worked by observing the KPT seamless welder filter while I was in highschool. I wish I could dig up all that old KPT stuff again….

There are better seamless tile algorithms out there…. this one is very primitive, but it will work nicely if used properly. Could work well with a composite texture in Papervision 3D for instance…

Read snippet: Seamless Tiles

Quadratic Bezier

var canvas:BitmapData=new BitmapData(280,280,false,0x000000);
addChild(new Bitmap(canvas, PixelSnapping.AUTO, true));
var color:uint;
// anchor x1, anchor y1,
// control-handle x2, control-handle y2,
// anchor x3, anchor y3, [resolution incremental value between 0-1]
function quadBezier(x1:Number, y1:Number, x2:Number, y2:Number, x3:Number, y3:Number, resolution:Number=.03):void {
	var b:Number,pre1:Number,pre2:Number,pre3:Number,pre4:Number;
	for (var a:Number = 0; a <1;a+=resolution) {
	
		b=1-a;
		pre1=(a*a);
		pre2=2*a*b;
		pre3=(b*b);
		
		canvas.setPixel(pre1*x1 + pre2*x2  + pre3*x3 ,
						             pre1*y1 + pre2*y2 + pre3*y3, color);
	}
}

// draw a few
color = 0xFFFFFF;

for (var i:int = 0; i<20; i++){
quadBezier(40,100, 150 , 20 + i * 10 , 200, 100,.01);
}

color = 0xFF0000;

for (i= 0; i<20; i++){
quadBezier(150,200, 100 + i * 10, 100  , 120, 30,.01);
}

The above demos a function that draws quadratic bezier curves using setPixel().

One of the first posts on this site was a snippet that used setPixel() to draw a cubic bezier curve. I recently needed to do the exact same thing but I wanted to use a quadratic bezier… I knew I had the code laying around somewhere, but I couldn’t seem to find it so I just looked on wikipedia and changed the previous cubicBezier() function accordingly.

Read snippet: Quadratic Bezier

Bresenham Circle Filled

var canvas:BitmapData = new BitmapData(400, 400, false, 0xCCCCCC);
addChild(new Bitmap(canvas));

fillCircle(100,100,50,0xFF0000);

function fillCircle(xp:Number,yp:Number, radius:Number, col:uint = 0x000000):void {
    var xoff:int =0;
	var yoff:int = radius;
	var balance:int = -radius;

	while (xoff <= yoff) {
		 var p0:int = xp - xoff;
		 var p1:int = xp - yoff;
		 
		 var w0:int = xoff + xoff;
		 var w1:int = yoff + yoff;
		 
		 hLine(p0, yp + yoff, w0, col);
		 hLine(p0, yp - yoff, w0, col);
		 
		 hLine(p1, yp + xoff, w1, col);
		 hLine(p1, yp - xoff, w1, col);
		
		if ((balance += xoff++ + xoff) >= 0) {
			balance-=--yoff+yoff;
		}
	}
}
 
function hLine(xp:Number, yp:Number, w:Number, col:uint):void {
	for (var i:int = 0; i < w; i++){
		canvas.setPixel(xp + i, yp, col);
	}
}

An implementation of yesterdays post that draws a filled circle instead of an outlined circle.

Read snippet: Bresenham Circle Filled

Bresenham Circle No Multiplication

var canvas:BitmapData = new BitmapData(400, 400, false, 0xCCCCCC);
addChild(new Bitmap(canvas));

drawCircle(200,100, 50);

// y, y radius, color
function drawCircle(xp:Number,yp:Number, radius:Number, col:uint =0x000000):void {
	var balance:int;
	var xoff:int;
	var yoff:int;
	xoff=0;
	yoff=radius;
	balance=- radius;

	while (xoff <= yoff) {
		canvas.setPixel(xp+xoff, yp+yoff, col);
		canvas.setPixel(xp-xoff, yp+yoff, col);
		canvas.setPixel(xp-xoff, yp-yoff, col);
		canvas.setPixel(xp+xoff, yp-yoff, col);
		canvas.setPixel(xp+yoff, yp+xoff, col);
		canvas.setPixel(xp-yoff, yp+xoff, col);
		canvas.setPixel(xp-yoff, yp-xoff, col);
		canvas.setPixel(xp+yoff, yp-xoff, col);

		if ((balance += xoff++ + xoff) >= 0) {
			balance-=--yoff+yoff;
		}
	}
}

The above demos a circle drawing algorithm. This will draw an outlined circle with no fill. This implementation doesn’t use multiplication.

Using setPixel to draw primitive shapes can be a good learning experience. I found this basic implementation of the Bresenham Circle algorithm a few years back and lost the original link…. I dug around for a good hour trying to find the original but to no avail. So if someone recognizes this interesting implementation …. let me know 🙂

The original code was written in java I think.

If your curious. The standard implementation I keep finding online looks something like this:

// ported from http://www.codeuu.com/Bresenham_Circle
function drawCircle(cx:Number, cy:Number, r:Number, col:uint):void{
	var xp:int  = 0, yp:int= r ;
	var d:int = 3 - (2 * r);
	
	while(xp <= yp){
		
		canvas.setPixel(cx+xp,cy+yp,col);
		canvas.setPixel(cx+yp,cy+xp,col);
		canvas.setPixel(cx-xp,cy+yp,col);
		canvas.setPixel(cx+yp,cy-xp,col);
		canvas.setPixel(cx-xp,cy-yp,col);
		canvas.setPixel(cx-yp,cy-xp,col);
		canvas.setPixel(cx+xp,cy-yp,col);
		canvas.setPixel(cx-yp,cy+xp,col);
		
		if (d<0){
			d += (4*xp)+6;
		}else{
			d += (4*(xp-yp))+10;
			yp -= 1;
		}
		xp++;
	}
	
}

I did a few speed tests against the first one that doesn’t make use of multiplication and it is only ever so slightly faster….

Read snippet: Bresenham Circle No Multiplication